
How to Measure and Template Window Graphics That Fit the First Time


Tobias is our voice for cutting, binding and large format, built from the knowledge of our production team, with over 20 years in printing.
A storefront graphic fails at the tape measure, not at the press. Installers measure glass a particular way, and the template changes between a cling, a decal and perforated vinyl.
Measure the visible glass, never the frame: take the width at the top, middle and bottom, the height at the left, center and right, and build the template on the smallest of each. Then let the material set the cut size. A static cling is ordered a quarter inch smaller per side so its edge stays off the gasket, a decal trimmed on site carries an eighth inch of bleed, and perforated vinyl runs edge to edge. One template per pane, always, because film cannot cross a mullion.
Quick answer
Three widths, three heights, and the material picks the cut
The template starts at the daylight opening, the glass you can actually see. Storefront glass is rarely square, so the width is measured at the top, middle and bottom, the height at the left, center and right, and the smallest of each becomes the template. From there the material takes over: a cling shrinks a quarter inch per side to clear the gasket, a site-trimmed decal grows an eighth inch of bleed, and perforated vinyl covers edge to edge from the outside. Every pane gets its own template and its own print file.
What a Window Template Is and Why the Frame Lies to You
A window template is a to-scale record of one pane of glass: its true visible width and height, plus everything that intrudes on it. It is the difference between a graphic that drops into place and one that gets field-trimmed with a utility knife while customers watch. Every order of window graphics we print, cling, decal or perforated film, is cut from the sizes on that record.
The trap is the frame. Aluminum storefront framing overlaps the glass behind a rubber gasket on all four sides, so the glass you can see, what installers call the daylight opening, is smaller than the glass that was fitted. Measure the frame and your graphic arrives oversized. Measure the full glass on the work order from the glazier and you get the same error, because part of that pane is buried in the frame.
So the rule is blunt: run the tape from where glass becomes visible to where it stops being visible, nothing else. Do it per pane, because two panes that look identical from the sidewalk are routinely a half inch apart. A five-pane storefront is five templates, not one measurement multiplied by five.
The payoff for this care is that products like clear window clings and clear window decals print to any custom size at 4OVER4.COM, so the size you template is exactly the size that ships. There is no stock-size rounding to hide a sloppy measurement behind.
How to Measure a Window for Graphics, Step by Step

The whole job takes ten minutes per storefront with a tape, a phone and a notepad.
One, measure the width three times. Across the top of the visible glass, across the middle, across the bottom. Glass sits in a frame that was installed by humans, and a quarter inch of taper from top to bottom is normal. Record all three.
Two, measure the height three times. Left edge, center, right edge. Same reason.
Three, keep the smallest of each. The template is built on the smallest width and the smallest height, because a graphic sized to the biggest reading will not fit the narrow end of the pane.
Four, log the obstructions. Push bars and handles on doors, alarm contacts and sensor boxes in corners, factory tint lines, etched compliance logos near the bottom edge. Note their distance from the nearest two glass edges so the artwork can route around them.
Five, photograph each pane straight on with the tape held in the shot. The photo settles every argument later, and it catches the obstruction you forgot to write down.
Six, sketch the elevation. Label the panes A, B, C from left to right, write the smallest width and height on each, and note the width of every mullion between them. That sketch becomes one print file per pane, and the mullion widths let a design flow across the run without drifting. When you build those files, our print-ready file guide covers resolution and color setup, and the blank template library gives you correctly sized starting layouts.
Cling, Decal or Perforated: the Material Changes the Template

Three films go on storefront glass, and each one wants a different relationship with the glass edge. This is where most self-measured orders go wrong: the glass was measured correctly and then the wrong size was ordered anyway.
| Material | Mounts | Order size vs glass | Where it wins |
|---|---|---|---|
| Static cling | Inside the glass, facing out | A quarter inch smaller per side, no bleed | Promotions and seasonal messages that come down and go back up. Removable and reusable, from $30. |
| Adhesive decal | Inside face-out, or outside | Exact glass size plus an eighth inch bleed if trimmed on site | Long-term branding, hours panels, logos that must survive window cleaning. |
| Perforated vinyl | Outside surface only | Edge to edge, full coverage, with bleed | Full-window advertising you can still see out of, from $30. |
| Frosted etched vinyl | Either face | Cut to the band, not the pane | Privacy bands on office and conference glass, sized to eye level rather than the full pane. |
The trade-offs are real. Static cling is the most forgiving to install and the easiest to remove, but a very large cling is a genuine wrestling match: with no adhesive holding progress in place, a pane-sized piece wants to fold onto itself while you squeegee. Big glass favors an adhesive window decal applied wet, or perforated window vinyl applied dry from outside. And perforated film has a limit nobody mentions until night falls: the see-through effect depends on the outside being brighter than the inside, so once the interior lights outshine the street, the view reverses. If staff need to see out at night, plan a partial panel instead of full coverage. The window perf guide covers that behavior in detail.
Partial Coverage, Doors and Multi-Pane Layouts

Full coverage is not the default, it is one choice among several, and often the weakest one for a shop that relies on daylight and eye contact with the street.
A partial layout keeps the graphic in the bottom third or top third of the pane and leaves the middle clear at standing eye level. It costs less film, installs faster, and the store stays visible from the sidewalk, which is worth more than the extra square footage of print. A white window cling band from $25 across the bottom third carries hours, offers and a phone number without darkening the room. Frosted bands do the same job for privacy: measure the band height to cover a seated or standing sightline, not the whole pane, and place it with its center near eye height.
Doors are the strictest pane on the storefront. Keep artwork out of the push-bar zone, expect a code or landlord requirement for a clear vision strip, and remember that a door slams a hundred times a day, which punishes a lifting edge faster than any window. An inside-mounted decal outlasts a cling here.
For a design that flows across several panes, build the whole elevation in one layout, including every mullion at its true width, then split it into per-pane files. Text is the one thing that must never touch a split: a headline that crosses a mullion loses its middle letters to the bar. Shift copy so each phrase lives entirely on one pane, and let only background imagery cross the gaps. If you want the sizing sanity-checked before you order, our prepress team reviews every uploaded file, and choosing window signage plus window cling pricing will settle the material and budget questions before the tape comes out.
Wally explains window templating
Measure the glass three times, trust the smallest number
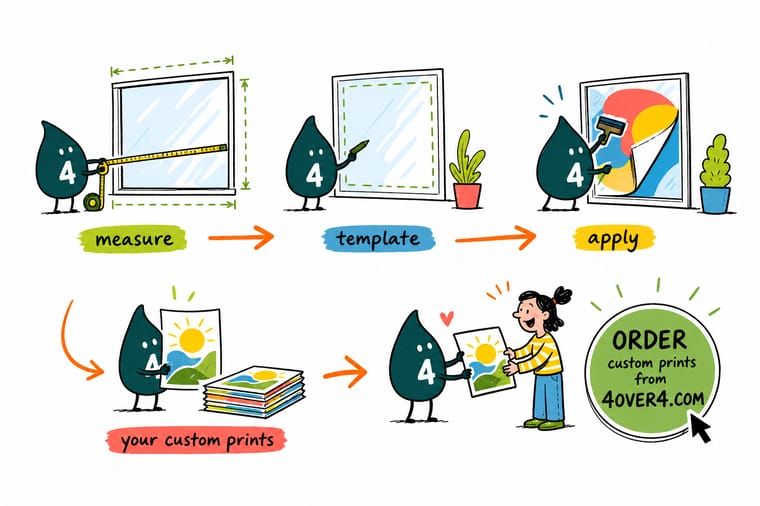
Wally runs his tape across the visible glass at the top, the middle and the bottom, then up it at the left, the center and the right. The smallest width and the smallest height go on the clipboard, and that is the template. Then he checks the film: a cling gets cut a quarter inch smaller per side so it stays off the rubber, a decal gets an eighth inch of bleed for the trim, and perforated vinyl covers the pane completely. One pane, one template, one file. He never lets a graphic cross a mullion, and neither should you.
Order clear window clings →
Specs and pricing
Window films, custom sizes, and starting prices
Compare the window materials side by side, with live configuration choices and starting prices straight from the 4OVER4.COM configurator. Every one prints at custom sizes, so the size you measured is the size you order. Clear window clings take any size from 6 to 53 inches wide and up to 120 inches tall, with an optional spot white ink layer and reverse printing for inside glass facing out, in 3 business days. White window clings run 8 to 53 inches wide in 2 business days, and perforated window vinyl covers the widest panes, up to 59 inches wide, also in 2 business days.



Print it
Order window graphics cut to your measurements
Type the smallest width and height from your template into the configurator. Clear window clings start at $30 and ship in 3 business days, perforated window vinyl starts at $30 for the outside face, and clear window decals print reversed for inside glass facing out at up to 53 by 120 inches.

Explore more
Where to go next
Measured and ordered? The next reads cover the wet install and the squeegee pass, cling against decal for your glass, why perforated film reverses at night, and what each size and film costs.


By the numbers
Window graphic work, and how often it arrives when promised
Common Questions
Your window measuring questions, answered
Do I measure the glass or the frame for a window graphic?
The glass only, and specifically the part of it you can see. The frame and its gasket overlap the glass edge on all four sides, so a graphic ordered at the frame dimension is too large before it leaves the box. Run the tape from where glass becomes visible on one side to where it disappears on the other. If you can, measure from inside the store for an inside-mounted cling and from outside for perforated vinyl, because the visible opening can differ slightly between the two faces.
How much smaller than the glass should a window cling be?
About a quarter inch smaller on every side. Static cling has no adhesive, so its edge needs to sit on flat glass, not ride up onto the rubber gasket, where it lifts and peels within days. A quarter inch of clear margin per side keeps the edge on glass and leaves room to shift the piece during installation. Clear window clings at 4OVER4.COM start at $30 and cut to any custom size, so order the finished size after the deduction, not the raw glass size.
Do window graphics need bleed?
It depends on how the edge is finished. A static cling floated inside the gasket needs no bleed because nothing gets trimmed at the glass. An adhesive decal or perforated panel that runs to the glass edge should carry an eighth inch of bleed past the measured size, because the installer trims the excess against the gasket with a knife after application. If your artwork stops exactly at the measured edge, any trim reveals a white sliver of unprinted film.
Can one graphic span several window panes?
The image can, the material cannot. Film applied across a mullion bridges the bar, wrinkles and fails, so each pane gets its own physical piece. Lay the full design over an elevation drawing of the whole window run, including the real width of each mullion, then split it into one print file per pane. Because the mullion width is inside the layout, the image reads continuously across the glass even though it is printed as separate panels.
Does the graphic go inside or outside the glass?
It follows the material. Clear and white static clings and clear adhesive decals are usually printed reversed and mounted inside the glass facing out, which keeps them away from weather and window cleaners. Perforated window vinyl only works from the outside surface, because the see-through effect depends on the printed face being brighter than the interior. If a landlord or mall rules out exterior application, perforated film is off the table and an inside-glass cling or decal is the honest substitute.
What about doors and required sightlines?
Treat a glass door as its own pane with its own hazards. Measure around the push bar and keep artwork clear of the handle zone where fingers land every day. Many towns and most malls also require a clear vision strip through door glass so staff can see who is entering, and full perforated coverage does not always satisfy it at night when the interior is lit. Check the local sign code or the tenant handbook before you commit to full coverage on an entry door.
Get Started
Measured your glass? Print graphics that fit it.
Enter your exact width and height, pick clear or white cling, adhesive decal or perforated vinyl, and we print the pane-perfect size you templated.
Legal Disclaimer
Gold Standard guarantees apply to all standard orders placed through 4over4.com. Price match requires verifiable proof of a competitor's published price for an equivalent product with matching specifications and turnaround time. Satisfaction guarantee covers manufacturing defects and print quality issues. Contact support with order number and documentation.
