
How to Hang a Poster Straight, Secure and Damage Free


Tobias is our voice for cutting, binding and large format, built from the knowledge of our production team, with over 20 years in printing.
Tape, putty, stretch-release strips, magnets, rails, frames and magnetic hangers all work, but only on the right surface. This guide matches each method to the wall you actually have, then shows how to get the sheet level and flat on the first attempt. It also covers when to order a paper poster, a mounted poster or a foam core poster for the wall you have.
To hang a poster, pick the method your wall surface allows, not the one you already own. Smooth painted drywall takes double-sided poster tape, mounting putty, or stretch-release strips. Plaster, brick, and textured stucco need a hook or rail. Glass, tile, and metal accept clear tape or magnets. Mark the top corners, check them with a level, attach the top two points first, then smooth downward from the center before pressing the bottom corners. For several prints on one wall, our guide to poster mounting without nails lays out a gallery wall.

Start here
Surface first, then the fixing
Choose the hanging method by surface, then by weight. Painted drywall accepts double-sided poster tape, mounting putty, and stretch-release strips. Plaster, brick, and textured walls need a masonry hook or a picture rail. Glass, tile, and metal take clear tape or magnets. Anything heavy, permanent, or worth protecting belongs in a frame or a magnetic poster hanger, where a single wall anchor carries the load and the paper stays untouched.
Why the way you hang a poster decides how long it survives

A poster fails in one of three ways. The corners curl away from the wall, the middle bows out and catches light, or the whole sheet comes down and takes a strip of paint with it. All three are hanging problems, not printing problems. The paper was fine when it left the press.
The fix is boring and effective: pick the method that suits your wall surface and the weight of your sheet, then place enough contact points to hold the paper flat. Our companion guide to hanging a poster damage free goes deeper on renter safe removal, and this page covers the full range of methods by surface.
One more thing worth saying up front. A poster hangs better when the print itself is built for it. Heavier stock, a matte or satin coating, and clean trim margins make every mounting method easier, because stiff paper wants to stay flat and thin paper wants to ripple.
Identify your wall surface before you touch any adhesive

Every hanging decision starts with the surface. Smooth painted drywall is the friendliest and accepts nearly everything. Flat and matte paints are the exception, because their porous finish bonds to adhesive far more aggressively than eggshell or satin, and that is where paint tears happen.
Bare plaster, brick, cinder block, and textured stucco give adhesive almost no continuous contact, so tape and strips drop within days. Glass, tile, metal, and laminate are the opposite: they are so smooth that clear tape and magnets both grip beautifully and release cleanly.
Wallpaper is the one surface to treat as off limits for anything sticky. Its seams lift under tension. Hang from a rail, a hook set into the wall behind it, or a freestanding frame instead. If your print is on rigid board rather than paper, the mounting rules change again, and the four best ways to hang foam board prints covers those panels directly.
Double-sided poster tape and mounting strips

Double-sided tape is the default because it disappears. Nothing shows from the front, the sheet sits truly flat against the wall, and the whole job takes two minutes. Use foam mounting squares for a slight standoff on textured paint, or thin clear tape when you want the poster completely flush.
Place four squares in the corners, roughly one inch in from each edge so the tape does not telegraph through thin stock, then add one on each long edge at the midpoint for anything larger than 18 by 24 inches. Press each point for a slow count of five. Adhesive needs pressure and time, not force.
Removal is where people get careless. Warm each square with a hairdryer for a few seconds, then peel the poster down along the wall rather than pulling it straight out. If you are hanging seasonal or campaign art that rotates often, these poster ideas are worth a look before you print the next run.
Poster putty and museum gel for total reversibility

Putty is the most forgiving option on the shelf. It grips through pressure and friction rather than a chemical bond, which means it comes off almost every painted surface without lifting anything. Dorms, rentals, and office walls that get repainted between tenants are exactly where it earns its keep.
Roll a pea-sized ball between your fingers until it warms and softens, flatten it slightly, and press it into each corner. Warm putty grips far better than cold putty straight from the pack. Museum gel, the clear version, does the same job without the faint oil ring that colored putty can leave on light paint over long periods.
The trade-off is holding power. Putty carries light paper well but sags under heavy cover stock in a warm room. If your poster is thick or oversized, treat putty as a temporary hang and plan for a frame. Designing from correctly sized artwork helps too, and our free poster templates guide keeps files sharp at full size.
Adhesive hooks and stretch-release strips

Stretch-release strips and small adhesive hooks are the middle ground between tape and hardware. They hold real weight, they come with a published weight rating, and their pull tab releases the bond by stretching the adhesive thin instead of tearing it away from the paint.
Take the weight rating seriously and then leave headroom. A rating assumes a clean, dry, room-temperature wall and a load hanging straight down. Bathrooms, kitchens, and sunny walls all reduce real world holding power, so a strip rated for a pound is a strip you should trust with half of that.
Hooks pair naturally with a hanger bar or a grommeted poster, which is how most retail and trade show displays are rigged. If you are producing posters for lit street furniture rather than interior walls, the sizing and mounting rules are different again, and poster printing for MUPIs explains those constraints.
Frames and magnetic poster hangers for a permanent display

The moment a poster is worth keeping, it belongs in a frame or a hanger. Both put the entire load on one wall anchor, which is structurally simpler and kinder to your paint than four adhesive points fighting gravity across the face of the sheet.
Magnetic wood hangers are the fastest upgrade in the category. Two wooden rails clamp the top and bottom edges with magnets, the top rail hangs from a nail or a small hook, and the bottom rail acts as a weight that pulls the poster perfectly flat. Swapping the art takes about ten seconds and leaves no marks on the paper at all.
Traditional frames add glazing, which protects against dust, fingerprints, and fading. Acrylic weighs less than glass and is safer in shared spaces. If you are still deciding what size to print before you buy a frame, this poster size comparison lays out the standard trims and the custom options side by side.
Magnets, rails, and hardware that never touches the paper

Some walls solve the problem for you. Metal lockers, whiteboards, filing cabinets, and steel shop fixtures all accept magnets directly, so a poster goes up in seconds with four small discs and comes down with zero residue. Strong neodymium magnets hold surprisingly heavy stock on vertical steel.
Picture rails and cable systems are the professional answer for offices, galleries, and any wall where the display rotates. One rail is installed once near the ceiling, and after that every hang is a matter of sliding a hook along the track. Nothing new gets drilled, and nothing sticks to the wall.
Binder clips on a length of cord are the low budget version of the same idea, and they look intentional when the cord is taut and the clips are matched. All three approaches share the same virtue: the hardware carries the load and the paper stays untouched, which is what makes them the right call for art you plan to keep.
Mounted and rigid prints hang differently from paper

Mounting a poster to foam board, gatorboard, or styrene converts it from a flexible sheet into a panel. Panels never ripple, never curl at the corners, and never need a contact point in the middle, because the board holds its own shape.
The trade-off is thickness and weight. Tape squares meant for paper will not hold a half-inch panel, so use heavy-duty mounting strips, a French cleat, or hook and loop tape rated for the actual weight. On a smooth wall, four heavy strips near the corners will carry a standard mounted poster comfortably. Our guide to mounted poster printing covers the board choice before you order.
Rigid panels are also the honest choice for anywhere the display gets bumped, such as trade show booths, reception areas, and school hallways. Paper in those settings tears at the corners within a week. A mounted panel simply stays where you put it.
A step-by-step method that gets the poster level the first time

Work in this order and you will not need a second attempt. First, clean the wall with a dry microfiber cloth and let it fully dry, because dust is the reason most adhesive fails early. Second, hold the poster in position and mark the two top corners with a light pencil dot.
Third, check those two dots with a level. Rooms lie. Ceiling lines and door frames are frequently out of true, so trust the bubble, not the architecture. Fourth, attach only the top two contact points and step back six feet to look at it before you commit anything else.
Fifth, smooth the sheet downward from the center outward with the flat of your hand to push trapped air toward the edges, then press the bottom corners and any mid-edge points. If you print seasonal art on a schedule, keeping the same trim size across runs means the marks stay reusable, which is a small trick worth knowing for pieces like holiday poster and flyer designs.
Printing posters and tags that are built to hang

Everything above gets easier when the printed piece is specified for display. Heavier stock resists curl. A matte or satin coating cuts glare under ceiling lights so the design stays readable from an angle. Standard trim sizes make frames and hangers cheap and easy to source, and mounting to rigid board removes the flatness problem entirely.
Price scales with size, stock, coating, quantity, and turnaround, in roughly that order. The same logic applies to the small hanging pieces that live alongside poster work in retail displays. Standard hang tags start at $64.81, folded hang tags start at $95.56 for the two-panel format, and bottle neck hang tags start at $108.75 for the die-cut collar shape used on bottles and jars. For the options on any of these, read how to customize your print order from size to coating to shape.
If you are choosing stock for a wall piece and are not sure how a paper will behave once it is up, order free paper samples first and tape a swatch to the actual wall for a day. Comparing options before you commit is also the point of our poster printing comparison. Every size and stock we sell sits on one page under posters printing.
Wally explains poster hanging
The wall decides the method, every single time
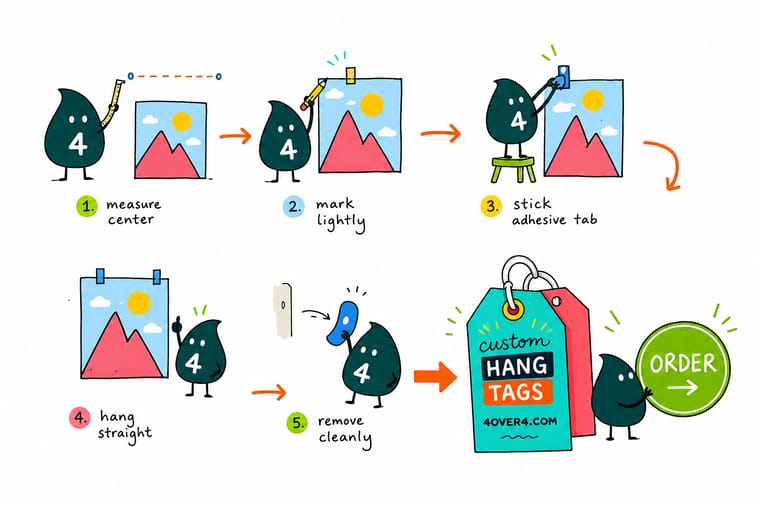
Wally has watched a lot of posters slide down a lot of walls. His rule is simple: name the surface before you reach for anything sticky, use the lightest hold that carries the sheet, and put the top two points up first so you can check the line before you commit. For anything you actually care about, skip adhesive and hang it from a magnetic hanger or a frame.
Order printed hang tags →
Infographic
Seven ways to hang a poster, matched to the surface
Seven methods on one frame, from poster tape on smooth drywall to hooks and rails for plaster and brick. Save it or keep it open while you work, and match the method to the wall in front of you and the weight of the sheet or panel.
No single method wins everywhere. Adhesive suits smooth painted drywall and short display runs, hardware suits plaster, brick, and anything permanent, and heavier stock makes every one of the seven work better.
Specs and pricing
Standard hang tag specs and live pricing
Wall display and product display share the same instinct, which is that printed pieces should hang cleanly. Here are the current specs and live prices for standard hang tags.

| Quantity | Price Per Unit | Total |
|---|---|---|
| 50 | 50.5¢ | $25.27 |
| 100 | 28.6¢ | $28.56 |
| 200 | 15.9¢ | $31.86 |
| 300 | 12.4¢ | $37.35 |
| 400 | 10.2¢ | $40.64 |
| 500 | 8.79¢ | $43.94 |
| 600 | 8.24¢ | $49.43 |
| 700 | 7.53¢ | $52.73 |
Print it
Printed pieces made to hang, from 4OVER4




Explore more
Where to go next





By the numbers
Sixty paper types a poster can be printed on
Common Questions
Common questions about hanging posters
What is the best way to hang a poster without damaging the wall?
Removable double-sided poster tape or mounting putty is the safest pairing for painted drywall. Both hold a paper sheet flat and release without pulling paint when you warm the strip slightly and peel it straight down rather than out from the wall. For heavier stock, mounted prints, or anything you want to keep for years, a magnetic poster hanger on a single small nail transfers all the weight to one anchor point and leaves one pinhole instead of four adhesive scars.
Which hanging method does my wall surface allow?
Start with the surface. Smooth painted drywall accepts tape, putty, and stretch-release hooks. Bare plaster, brick, concrete, and textured stucco reject adhesive almost immediately, so use a masonry hook or a rail system there. Glass, tile, and metal lockers take clear tape or magnets well. Wallpaper and freshly painted walls, meaning anything painted in the last month, are the two surfaces where you should skip adhesive entirely and hang from a hook or frame.
What does poster printing cost and how are prices set?
Poster price is driven by size, paper stock, quantity, coating, and turnaround. Larger sheets use more material, heavier stocks and matte or gloss coatings add cost per piece, and short runs carry a higher unit price because setup is spread across fewer copies. Choosing a standard trim size and a standard turnaround is the fastest way to bring the number down without touching the look of the finished print.
What sizes, stocks, and finishes work best for posters you plan to hang?
Common poster trims run from 11 by 17 inches up to 24 by 36 inches and larger for retail and event work. For wall display, a heavier text or cover stock resists curl far better than thin paper. Matte and satin coatings cut glare under ceiling lights, which matters in offices and galleries, while gloss makes photography pop under controlled lighting. Add mounting to foam board when you want a rigid panel that hangs perfectly flat.
How long does poster printing take to produce and ship?
Production time depends on the stock, the coating, and any mounting or finishing you add. Plain uncoated and coated posters move fastest because they go straight from press to trim. Mounted, laminated, or grommeted pieces need extra handling time. Shipping is separate from production, so when you have a hard install date, count both and place the order with a few days of cushion.
Will poster tape ruin rental paint?
It can, and the risk goes up with cheap foam tape and with paint that was applied recently or applied thinly over patched drywall. Test a single small square in a low corner and leave it for two days before committing to the whole sheet. If the test square lifts paint, switch to putty, which grips with pressure rather than a permanent bond, or move to a hook and hanger setup.
How do I get a poster perfectly straight and level on the wall?
Mark the top corners lightly with a pencil, check the marks with a level or a phone level app, then attach only the top two contact points and step back to look before pressing the bottom down. Wall corners and ceiling lines are often out of true, so trust the level over the room. Once the top edge is fixed, smooth the sheet downward from the center to push out trapped air before securing the lower corners.
Get Started
Measure the surface, then pick the fixing
Bring your artwork to 4OVER4.COM, pick a stock that stays flat on the wall, and get press quality output that holds up long after it goes up.
Legal Disclaimer
Gold Standard guarantees apply to all standard orders placed through 4over4.com. Price match requires verifiable proof of a competitor's published price for an equivalent product with matching specifications and turnaround time. Satisfaction guarantee covers manufacturing defects and print quality issues. Contact support with order number and documentation.
