- Home
- content hub
- How to Print Large Posters That Actually Look Professional
How to Print Large Posters That Actually Look Professional
Emma Davis
Content Writer
Jun 20, 20252573 views
Jun 20, 20252573 views

Getting Your Design Ready for Large Format Success
It's a classic, painful, and often expensive mistake: assuming a design that looks razor-sharp on your monitor will automatically translate to a massive physical print. What seems crisp and vibrant on-screen can quickly devolve into a pixelated, blurry mess when stretched to poster size. The secret isn't just about crafting a beautiful design, but about preparing that design for the physical realities of large-format printing.
The Resolution Reality Check
Let's get real about resolution. You’ve probably heard the term DPI (dots per inch). For a standard 8.5" x 11" flyer you hold in your hands, 300 DPI is the gold standard for clean, sharp printing. But for large posters, the rules bend because of one critical factor: viewing distance. Nobody is going to be inspecting your 24" x 36" trade show poster from two inches away.
- Close-Up Viewing (up to 3 feet): Think posters in a hallway or point-of-sale displays right next to a product. For these, stick closer to 200-300 DPI. This ensures that any fine details or small text remain perfectly legible.
- Medium Distance (3-10 feet): This is the sweet spot for event posters or artwork in a lobby. Here, you can comfortably drop the resolution to 150-200 DPI. From this distance, the human eye won't notice the slight decrease in dot density.
- Distant Viewing (10+ feet): For large banners or signs meant to be seen from across a room or outdoor space, 100-150 DPI is often more than enough. Attempting to use 300 DPI for a huge banner would result in a massive, difficult-to-manage file with no real visual payoff for the viewer.
It's all about the effective resolution—how sharp the image appears from where your audience is actually standing. Before you even start designing, consider how your poster will be viewed. To help you plan, here's a quick guide on the resolution you'll need for some common poster sizes.
| Poster Size | Minimum DPI | Recommended DPI | File Size (MB) |
|---|---|---|---|
| 18" x 24" | 100 DPI | 150 DPI | ~20-45 MB |
| 24" x 36" | 100 DPI | 150 DPI | ~35-80 MB |
| 27" x 40" | 75 DPI | 120 DPI | ~30-75 MB |
| 40" x 60" | 75 DPI | 100 DPI | ~45-80 MB |
As you can see, the "best" resolution changes with the physical dimensions of your poster. A higher DPI is always safer, but for very large prints, a lower DPI is practical and won't compromise the final look from a distance.
Designing for Scale and Impact
Thinking big means more than just scaling up your canvas; it requires you to re-evaluate every design element. A delicate, thin font that looks sophisticated on a business card will simply vanish on a large poster. You need to think bold.
This infographic gives a great visual sense of how much bigger each standard poster size is compared to the next.
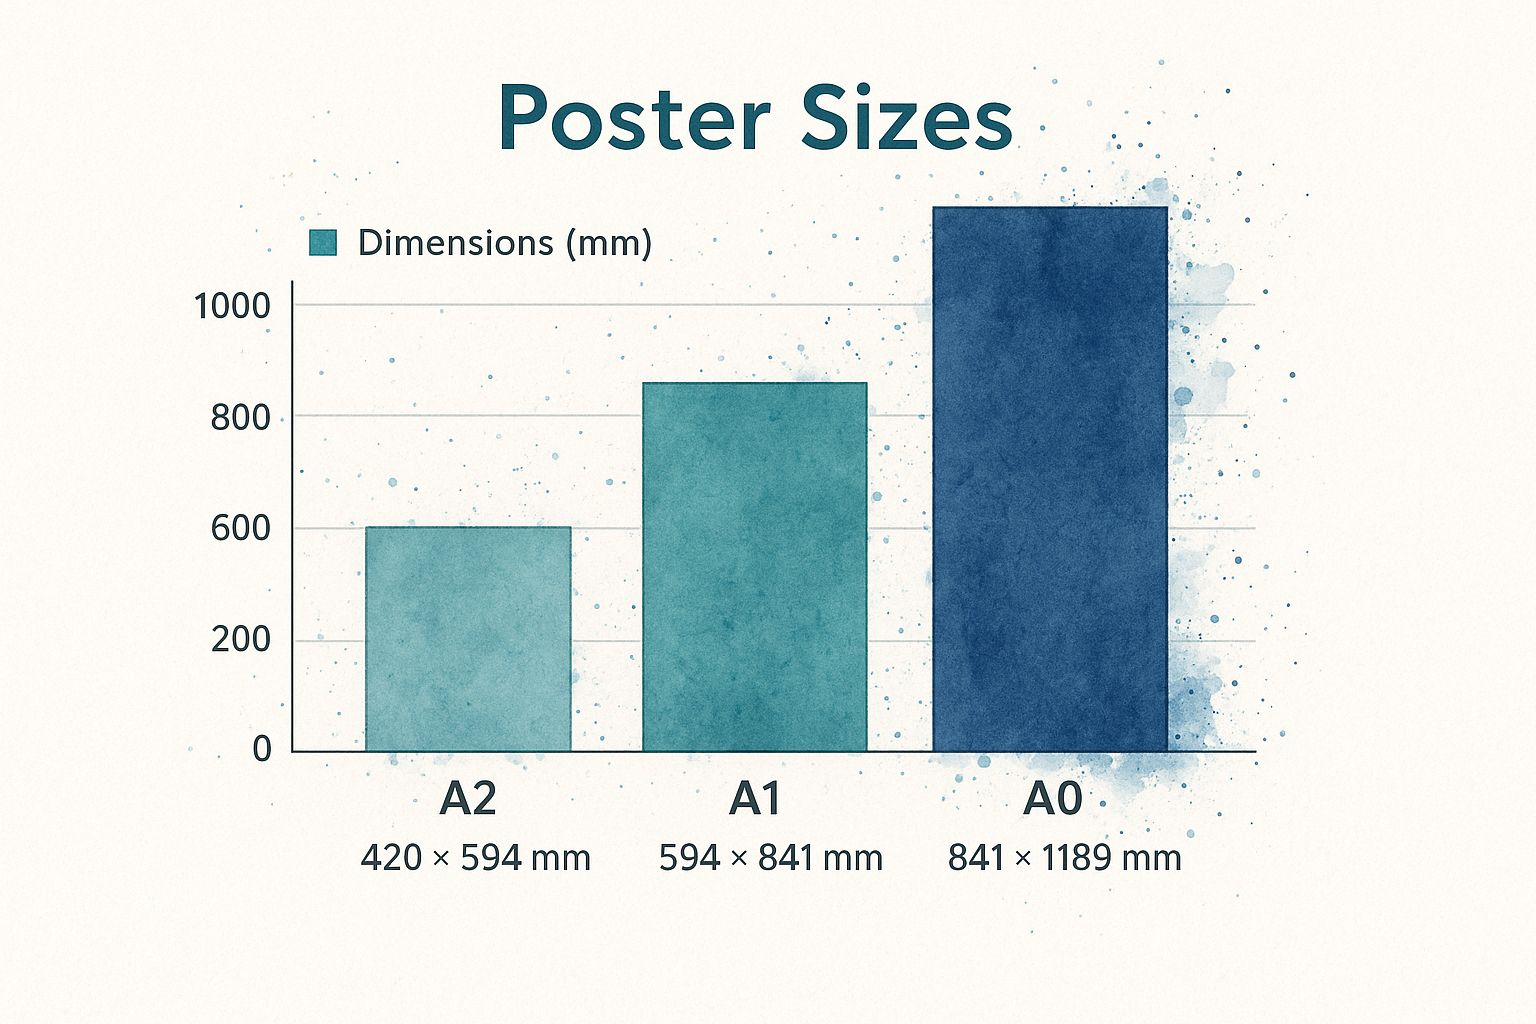
Seeing the sizes laid out like this makes it obvious how quickly your canvas area grows. This expansion demands bolder typography and more powerful imagery to maintain its impact from afar.
Finally, and this is a big one, always set up your design file in the CMYK (Cyan, Magenta, Yellow, Key/Black) color profile. Do not use RGB (Red, Green, Blue). RGB is for digital screens, while CMYK is the standard for the printing industry. That vibrant electric blue you perfected in RGB could print as a dull, disappointing purple if your file isn't set to CMYK from the start. Tools like Adobe Photoshop or Illustrator make this an easy setting to change before you begin.
By focusing on these technical details upfront, you ensure your vision becomes a high-quality reality. When you're ready, check out our extensive online large format print options to see all the possibilities.
Choosing Materials That Make Your Message Pop
You've nailed the design, but now the success of your poster hinges on the physical material it’s printed on—the substrate. This choice is just as critical as your artwork, defining the final look, feel, and lifespan of your project. I once spoke with a retail manager who tried to save a few dollars on a major promotion by opting for the thinnest, most basic paper available. The posters looked sharp for a day, but the store's bright overhead lights created a distracting glare. To make matters worse, a bit of humidity from the front door caused them to curl within a week. They ended up reprinting everything on a sturdier matte stock, which cost them more in the end. It's a classic example of how selecting the right material from the start saves both money and headaches.

Substrates for Every Scenario
When you're figuring out how to print large posters, the first two questions should always be: where will it be displayed, and for how long? The answers will point you directly to the perfect material.
- Standard Poster Paper (Gloss & Matte): This is your reliable choice for most indoor applications. Glossy paper makes colors pop and is fantastic for photo-heavy designs. Just be mindful of direct lighting, as it can cause glare. Matte paper, with its non-reflective surface, offers a more subdued, high-end feel that’s ideal for text-heavy posters or displays in brightly lit spaces.
- Photo Paper: If you're printing high-resolution photography or fine art, this material is worth the investment. It delivers superior color depth and sharpness, making every detail stand out.
- Vinyl and PVC: These are your champions for durability and weather resistance. For an outdoor concert, a long-term retail display, or any situation where the poster needs to withstand the elements, a waterproof and tear-resistant vinyl banner is a much smarter choice than paper.
- Backlit Film: Have you ever noticed those brilliantly glowing posters in movie theaters or at bus stops? That's backlit film. It’s a special translucent material made to be lit from behind, creating an eye-catching effect that’s impossible to miss, especially after dark.
To help you visualize the best options for your project, here’s a quick comparison of common poster materials.
Poster Material Comparison Guide
This table breaks down different poster substrates, highlighting their durability, ideal uses, and other key characteristics to guide your decision.
| Material Type | Durability | Best Use Case | Cost Level | Weather Resistance |
|---|---|---|---|---|
| Glossy Paper | Low | Indoor photo-rich posters, short-term promotions | Low | None |
| Matte Paper | Low-Medium | Indoor text-heavy posters, art prints, areas with bright lights | Low-Medium | None |
| Photo Paper | Medium | High-resolution photography, fine art gallery prints | High | Low |
| Vinyl/PVC | High | Outdoor banners, long-term retail displays, trade shows | Medium-High | High (Waterproof & Tear-Resistant) |
| Backlit Film | High | Lightbox displays (movie theaters, airports, bus stops) | High | Varies (Typically for protected outdoor use) |
Choosing between glossy and matte paper is a common first step, but as you can see, materials like vinyl and backlit film open up new possibilities for making a lasting impression.
The material you select is also linked to the printing technology used. Modern large format printers accommodate a huge range of substrates—including textiles and other specialty materials—thanks to advanced ink technologies like aqueous, UV-curable, and latex. This flexibility is a key driver behind the growth in advertising and promotional merchandise. To get a better sense of this trend, you can explore the latest reports on the large format printer market.
By understanding these options, you can ensure your poster doesn't just look great on screen but performs perfectly in the real world.
Mastering File Formats and Technical Requirements
Getting your design ready is one thing; packaging it correctly for the printer is another. This technical step is where many well-designed poster projects hit a snag, leading to frustrating reprints and unexpected results. Think of your print file as the blueprint for your poster. If the blueprint has flaws, the final product will be imperfect, no matter how great the original concept was. Let's cut through the technical jargon and get your files truly print-ready.
File Format: The Vector vs. Raster Showdown
The first decision you'll make is choosing the right file type. Your design software can save in dozens of formats, but for large posters, two categories matter most: raster and vector.
- Raster Files (JPEG, TIFF, PNG): These are built from pixels and are perfect for photographs. However, they can become blurry or "pixelated" when scaled up beyond their original size. A high-resolution JPEG might work for a small poster, but for larger dimensions, you seriously risk losing sharpness.
- Vector Files (PDF, AI, EPS): These files are built from mathematical equations, not pixels. This means they can be scaled infinitely without any loss of quality. A logo that is one inch tall in a vector file can be stretched to ten feet tall and will remain perfectly crisp.
For posters that mix text, logos, and graphics, a high-quality PDF is almost always your best bet. It’s a universal format that can contain both vector and raster elements, making it the most flexible choice for professional printing. It’s a key part of learning how to print large posters that look amazing.
Critical Technical Checks Before You Upload
Before you send that file off, run through this quick pre-flight checklist. A few minutes here can save you days of waiting for a corrected reprint.
| Technical Requirement | Why It Matters | How to Fix It |
|---|---|---|
| Color Mode | Your screen uses RGB (light), but printers use CMYK (ink). An RGB file can cause major color shifts, turning your bright, vibrant reds into a dull burgundy. | Convert your document to CMYK in your design software, like Adobe Illustrator or Photoshop, before you start designing. |
| Bleed | Printers trim posters to their final size. Without a bleed—extending your design ~0.125 inches beyond the edge—you risk getting an ugly thin white border. | Set up a bleed in your document settings. Make sure any background colors and images extend fully into this bleed area. |
| Font Embedding | If you use a special font the printer doesn't have, their system will substitute it, often with something generic like Times New Roman, ruining your design. | When saving as a PDF, ensure all fonts are embedded or outlined (converted to shapes). This locks them into the design permanently. |
These checks are fundamental for both traditional and modern printing methods. For a deeper dive, you can learn more about how digital printing processes handle these technical aspects and why file preparation is so critical. By mastering these basics, you take control of the final quality and ensure your poster prints exactly as you imagined it.
Finding Print Services That Deliver Excellence
Once your design file is polished and ready to go, the next big step is finding the right partner to bring your vision to life. Choosing a print service isn't just about hunting for the lowest price; it's about finding a provider whose quality and reliability match your project's needs. A cheap poster that arrives looking faded or shows up late isn’t a bargain—it's a wasted opportunity.
Looking Beyond the Price Tag
When you're trying to figure out how to print large posters, it’s easy to focus only on the cost. But a truly great print partner offers value that goes far beyond the initial quote. The cheapest option might mean sacrificing crucial support, like having a real person review your file to catch a mistake before it goes to press. At 4OVER4, we pair competitive pricing with hands-on expertise to prevent those kinds of costly errors.
When you're checking out a print service, here are a few things to keep in mind:
- Customer Support: Can you actually talk to someone who knows what they're doing if you run into an issue? Chatbots are fine for simple questions, but complex projects need real expertise.
- Proofing Process: Do they send you a digital proof to approve? This is your last chance to spot any problems with the layout, color, or text before the presses start rolling.
- Turnaround Time vs. Shipping Time: Make sure you know the difference. A "same-day print" promise doesn't mean much if your order won't ship for another three days.
Why Speed and Accuracy Matter
In a world where everything moves quickly, speed is a huge deal. The pressure for faster delivery is pushing the entire printing industry to get better and more efficient. In fact, recent research shows that 59% of print businesses expect customer demand for faster turnarounds to grow, which is leading them to adopt automation.
This technology helps manage complicated jobs, cuts down on errors, and makes it possible to hit tight deadlines—a massive plus when you need a poster for an event that’s happening next week. For a deeper dive into these industry changes, you can check out a full analysis on emerging wide-format printing trends. This focus on streamlined production allows reliable printers like 4OVER4 to deliver excellent results without the frustrating delays.
Installation and Display Strategies for Maximum Impact
Your poster isn't truly finished until it’s displayed effectively. This final step is where many fantastic prints lose their power. A well-designed poster, fresh from the printer, can fall flat if it’s poorly lit, hung crooked, or placed in a spot that feels like an afterthought. Let’s explore practical strategies to ensure your investment grabs attention and looks professional from the moment it goes up.
Positioning and Lighting for Visual Appeal
Where you place your poster matters immensely. Think about the flow of traffic in the space. Is it for a retail store, a corporate hallway, or a trade show booth? For a retail display, positioning the poster near a related product can guide customer behavior. In a corporate setting, placing it at eye level in a well-trafficked area ensures it gets seen. A simple rule is to hang the center of the poster at roughly 57 inches from the floor, which is the average human eye level. This creates a natural and comfortable viewing experience.
Lighting is your poster’s best friend or worst enemy. Avoid placing glossy posters directly opposite a bright window, as the glare will make them unreadable. Instead, use angled track lighting or overhead spots to illuminate the poster evenly. This not only enhances the colors but also creates a focal point, drawing the viewer’s eye exactly where you want it. When considering large-scale visual impact, researching the best video projectors can offer alternative solutions to traditional printed posters, especially for dynamic displays.
Mounting Solutions for Every Situation
How you hang your poster affects both its appearance and longevity. For temporary displays like at a conference or a special sale, simple solutions work best.
- Adhesive Strips: Ideal for smooth walls and short-term use without causing damage.
- Poster Putty: A great reusable option for lightweight paper posters.
- Professional Stands: For trade shows or recurring events, investing in dedicated hardware is a smart move. Our line of custom banner stands printing provides a polished, portable, and durable solution that makes setup and teardown a breeze.
For permanent or long-term installations, consider more robust methods like professional framing or mounting on a rigid backing like foam core. This protects the poster from environmental factors like humidity and prevents the edges from curling over time, ensuring your message stays sharp and impactful for as long as you need it to.
Avoiding the Mistakes That Cost Time and Money
Knowing how to print large posters is only half the battle. The other half is dodging the expensive, time-consuming pitfalls that trip up so many people. It’s far cheaper to learn from someone else’s blunders than to make them yourself. Let's look at a few real-world scenarios where good projects went sideways and how you can prevent the same from happening to you.
Communication Breakdowns and Timeline Troubles
One of the most frequent points of failure is a simple communication gap. I once saw a marketing manager order posters for a big product launch, asking for a "gloss finish." The problem? The print provider offered two types of gloss: a standard one and a high-gloss UV coating. The manager received the standard finish, which didn't have the dramatic, wet-look sheen they had envisioned from seeing a competitor's poster. This misunderstanding led to a costly reprint to meet their brand standards, all because of one ambiguous word.
To make sure this doesn't happen to you:
- Be overly specific: Don't just say "blue." Specify the exact shade, like "Pantone 286 C."
- Request samples: If you're unsure about a paper stock, ask for samples. Feeling the texture and seeing the sheen with your own eyes removes all the guesswork.
- Confirm all details: Always triple-check your order confirmation and digital proof. Make sure the material, size, and finish specifications are exactly what you expect.
Managing your timeline is another area ripe for disaster. Murphy’s Law has a special fondness for tight deadlines. While rushing an order might seem like a quick fix, it often magnifies any small errors in your file. A much smarter approach is to build a buffer into your project schedule. If you need posters in hand by Friday, aim for a Wednesday delivery. This cushion gives you time to handle any shipping delays or quality control issues without derailing your campaign. For projects with unique finishes or die-cuts, you might want to explore a specialty printing collection, but remember to account for slightly longer production times.
The True Cost of "Shortcuts"
Taking shortcuts, like skipping the proofing process just to save a day, is a recipe for regret. A minor typo or a low-resolution logo might look perfectly fine on your monitor, but it can become a glaring, embarrassing mistake on a 24" x 36" print. This is why a thorough quality control check is an absolute must.
The technology behind poster printing is always getting better. The global large-format printer market is projected to grow at a 5.0% CAGR through 2030, fueled by automation and design tools that make production much smoother. These advancements make professional printing faster and more accessible than ever, which reduces the temptation to take risky shortcuts. You can learn more about how technology is shaping the industry and making high-quality results more attainable. By building in enough time for proper checks and communicating with total clarity, you protect your budget and ensure your final poster is something you’ll be proud of.
Key Takeaways for Consistently Great Results
We've covered a lot of ground in this guide, from avoiding common design mistakes to choosing the right materials and navigating the technical side of things. Now, let’s boil it all down into a handy checklist you can use for every large-format poster project. Think of this as your final pre-flight check to make sure your work turns out professional and impressive every single time.
Your Design and File Prep Checklist
The journey to a fantastic poster always starts with a solid, well-prepared file. Getting these fundamentals right from the beginning is the surest way to avoid a disappointing print.
- Rethink Resolution: The old 300 DPI rule doesn't always apply to large formats. First, consider how far away people will be when they see your poster. For up-close viewing (like in a gallery), 200-300 DPI is a good target. But if your poster will be seen from over 10 feet away, 100-150 DPI is often more than enough and keeps your file size manageable.
- Get the Color Right: Always design and save your files in the CMYK color profile. This simple step prevents the dreaded color shift that happens when vibrant on-screen RGB colors look dull or completely different when printed.
- Make Friends with Vector: Whenever you're working with logos, text, or solid graphics, use a vector format like PDF, AI, or EPS. This is your secret weapon for infinite scalability, meaning your graphics will stay perfectly sharp no matter how big you print them.
- Mind the Bleed and Fonts: Add a 0.125-inch bleed around your entire design. This extra margin ensures you won't have any ugly white slivers after the poster is trimmed. Just as important, make sure to either embed or outline your fonts when you save your PDF. This locks in your typography, so it prints exactly how you designed it.
Material and Provider Selection
With your file prepped and ready, the next set of choices will define the final look, feel, and durability of your poster.
Don't let a great design fall flat because of the wrong paper. For indoor displays in well-lit rooms, a matte finish is perfect for cutting down on glare. If your design is packed with vibrant photos, a glossy finish will make those colors truly pop. And if your poster is destined for the great outdoors or needs to hold up for months, investing in a tough substrate like vinyl is a must.
Finally, choosing a print partner you can trust is just as critical as the design itself. Don't just shop for the lowest price. A service that provides a free digital proof reviewed by a real person can be a lifesaver, catching errors before they become expensive mistakes. At 4OVER4, we bring together cutting-edge printing technology and more than 20 years of hands-on experience to make sure your project is a success.
Ready to bring your vision to life? Explore our huge selection of custom poster printing options at 4OVER4.com and let’s create something amazing together.
More from how to print large posters
10
Want to know the real secret to getting a poster to stick to a wall without it peeling off in the middle of the night? It's all about what
 Emma Davis
Jan 28, 2026
21
When you hear "table tent specs," what we're really talking about are the foundational details for printing them correctly: the
 Emma Davis
Jan 27, 2026
84
When you're ready to print a poster, one of the first questions you'll face is, "What size should it be?" The industry has a
 Emma Davis
Jan 26, 2026
97
Picture this: you're at a networking event, and someone hands you their business card. You do the usual glance—name, title, company—an
 Emma Davis
Jan 25, 2026
116
Believe it or not, figuring out how to make a card in Word is surprisingly easy. You can knock out everything from slick, professional busines
 Emma Davis
Jan 24, 2026
108
Printing on packaging takes a simple container and turns it into one of your most powerful marketing tools. It’s the very first physical int
 Emma Davis
Jan 23, 2026
370
When you're getting ready to print a flyer, one of the first questions you'll face is, "What size should it be?" The most co
 Emma Davis
Jan 22, 2026
337
How Our Free Business Cards Program Works (Quick Overview) Free business cards are available through two different
 Emma Davis
Jan 22, 2026


