Flexographic Printing at a Glance
Flexographic printing is a high-speed method that uses flexible relief plates and fast-drying inks to print on nearly any substrate - paper, plastic film, foil, corrugated board, and more. It's the dominant technology behind packaging you see on store shelves every day. Think chip bags, shipping boxes, and product labels produced at massive volume. 4OVER4.COM has been helping businesses with 1,000+ products across print categories for 25+ years, and understanding flexographic printing helps you make smarter choices for your packaging and label projects.
How Flexographic Printing Works - and Why It Matters
Flexographic printing works like an industrial-grade rubber stamp on steroids. A flexible photopolymer plate wraps around a rotating cylinder, picks up ink from an anilox roller, and transfers the image directly onto your chosen material at high speed. That's the short version. The longer version? It's the reason your cereal box looks sharp, your drink label stays bright in a cooler, and your shipping carton arrives with clean branding intact.
If you're exploring print options for your business, understanding what flexographic printing is gives you a real advantage when choosing between production methods. Whether you're designing packaging with the Online Designer or prepping artwork for large-format runs, knowing flexo's strengths and limits saves you time and money.
Flexo shares some DNA with traditional relief printing - similar to how rubber stamps work. If you've ever wondered about plate maintenance, our guide on How To Clean Rubber Stamps covers related care principles. And for digital design prep before any print method, the Online Designer gives you a head start on file setup.
The Complete Breakdown of Flexographic Printing
Flexographic printing is a rotary printing process that uses flexible plates, fast-drying inks, and a series of precisely engineered rollers to produce images at high speed. It's the workhorse behind most packaging printing worldwide. If you've held a cardboard box, peeled a label off a bottle, or opened a bag of chips today - you've probably touched something printed with flexo.
Let's break down every part of this process so you understand exactly how it works, where it shines, and where other methods might be a better fit.
The Anatomy of a Flexo Press
A flexographic press has several key components working together in a continuous loop. The plate cylinder holds the flexible printing plate - made from photopolymer material - that carries your image. The anilox roller is a precision-engraved cylinder covered in tiny cells that meter exact amounts of ink onto the plate. The impression cylinder presses the substrate against the plate to transfer the image.
Between the ink fountain and the anilox roller sits a doctor blade - a thin metal strip that scrapes excess ink off the anilox surface. This is what gives flexo its consistency. Every rotation delivers the same measured amount of ink, which means your 10,000th print looks the same as your first.
The substrate - whatever you're printing on - feeds through the press at speed. Modern flexo presses can handle web widths from a few inches to over 60 inches, running at speeds that make offset and digital look like they're standing still.
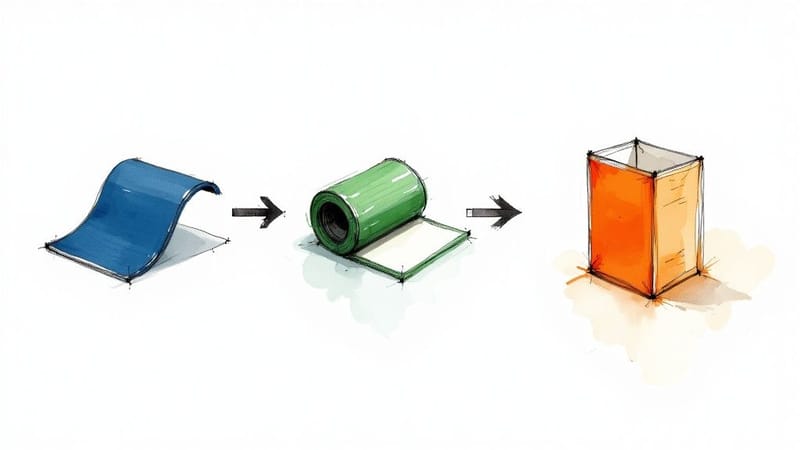
Plate Making: Where Quality Starts
The printing plate is the heart of flexographic printing. These plates are made from photopolymer - a light-sensitive plastic material that hardens when exposed to UV light. Here's the process:
- Digital file preparation - Your artwork gets converted into a negative or directly imaged onto the plate using laser technology (CTP, or computer-to-plate)
- UV exposure - The plate material hardens in the areas that will carry ink
- Washout - Unexposed areas get washed away, leaving raised image areas on the plate surface
- Drying and finishing - The plate gets dried, given a final UV exposure for durability, and mounted on the plate cylinder
Modern CTP technology has dramatically improved flexo plate quality. The raised image areas can now reproduce fine detail, small text, and smooth gradients that would have been impossible just 15 years ago. If you're interested in how design files translate to physical print products, our guide on How To Make Flyers covers file prep fundamentals that apply across print methods.
Ink Systems in Flexographic Printing
Flexo uses three main ink types, and each one serves a different purpose:
- Water-based inks - The most common choice for paper and cardboard substrates. They dry through absorption and evaporation. Lower VOC emissions make them the more environmentally friendly option.
- Solvent-based inks - Used primarily on non-porous substrates like plastic films and foils. They dry through solvent evaporation and bond well to slick surfaces.
- UV-curable inks - These inks cure instantly when hit with UV light. They produce sharp, bright results and work on a wide range of substrates. No solvents to evaporate means near-zero VOC emissions.
The ink choice depends entirely on your substrate and end use. Food packaging, for example, has strict regulations about which inks can be used. A product label that sits in a refrigerated cooler needs different ink chemistry than a corrugated shipping box.
What Makes Flexo Different from Other Print Methods
Understanding flexographic printing means understanding how it compares to the alternatives. Here's where flexo stands out - and where it doesn't.
Flexo vs. Offset Lithography: Offset uses flat plates and oil-based inks. It produces exceptional image quality on paper stocks and is the gold standard for commercial print like brochures and marketing materials. Our guide on How To Fold A Brochure covers products that typically use offset. But offset can't print on plastic film or corrugated board - flexo can. For packaging, flexo wins on substrate versatility and speed.
Flexo vs. Gravure: Gravure uses engraved metal cylinders and produces stunning image quality - arguably the best in packaging printing. But gravure cylinders are expensive to produce, making it cost-effective only for extremely long runs (millions of impressions). Flexo's lower plate costs make it practical for shorter runs while still delivering strong quality.
Flexo vs. Digital: Digital printing needs no plates at all, making it perfect for short runs, variable data, and rapid prototyping. But digital can't match flexo's speed on long runs, and substrate options are more limited. For runs under 5,000 units, digital often makes more sense. Above that threshold, flexo's per-unit cost drops fast.
Substrates: What Can Flexo Print On?
This is where flexographic printing really earns its reputation. The flexible plate conforms to irregular surfaces, which means flexo handles substrates that would jam or damage a rigid offset plate. Common flexo substrates include:
- Corrugated cardboard - shipping boxes, retail displays, pizza boxes
- Plastic films - food packaging, shrink wrap, bags
- Paper and paperboard - folding cartons, labels, gift wrap
- Metallic foils - snack packaging, pharmaceutical blister packs
- Non-woven fabrics - reusable shopping bags, medical packaging
This range is why flexo dominates the packaging industry. No other single print method handles this many material types at production speed. If you're working on projects that involve custom packaging elements like Christmas Door Hangers or specialty items, understanding your substrate options helps you pick the right production method.
Common Applications of Flexographic Printing
Flexo touches almost every consumer product category. Here are the big ones:
Food and beverage packaging - from cereal boxes to juice cartons to candy wrappers. Flexo's ability to use food-safe inks on flexible films makes it the default choice here.
Labels and tags - pressure-sensitive labels, shrink sleeves, and hang tags. Narrow-web flexo presses are built specifically for label production, running rolls of label stock at high speed with precise die-cutting inline.
Corrugated boxes - both the basic brown shipping box with simple text and the fully printed retail-ready packaging you see on store shelves. Wide-web flexo presses handle these large formats efficiently.
Newspapers and directories - while this market has shrunk, flexo remains a common method for newspaper printing due to its speed and compatibility with newsprint.
For creating custom items like magnets, envelopes, or other printed products that pair with packaging, check out guides on Custom Magnets Faq and How To Make Envelopes for related project ideas.
Quality Considerations in Flexo
Flexographic printing quality has improved dramatically over the past two decades. High-definition (HD) flexo plates now achieve line screens of 175 LPI and higher - approaching offset quality in many applications. But there are still factors that affect output:
Dot gain is the biggest challenge. When ink transfers from a flexible plate to a substrate under pressure, dots tend to spread slightly. This means highlights can fill in and shadows can plug up. Skilled prepress operators compensate for this by adjusting the artwork - reducing dot sizes in the file so the printed result lands where it should.
Plate mounting accuracy matters for multi-color registration. Each color prints from a separate plate on a separate station. If plates aren't mounted with precision, colors shift and images look blurry. Modern mounting systems use cameras and pin registration to keep alignment tight.
Anilox specification controls ink volume. Different jobs need different anilox rollers - high cell counts for fine detail work, lower cell counts for heavy solid coverage. Getting this wrong means either starving the image of ink or flooding it.
For more printing knowledge across all methods, browse the Faq Hub where 4OVER4.COM covers everything from paper selection to finishing techniques.
The Future of Flexographic Printing
Flexo isn't standing still. Several trends are shaping where this technology goes next:
Extended color gamut (ECG) printing uses a fixed set of 7 ink colors instead of mixing custom spot colors for each job. This reduces plate changes, cuts waste, and speeds up makeready time. It's a big deal for brands that need consistent color across multiple packaging SKUs.
Automation and closed-loop color control systems now monitor print quality in real time, adjusting ink density and registration on the fly. Less human intervention means less waste and more consistency.
Sustainability improvements continue to push flexo forward. Water-based and UV inks reduce environmental impact. Thinner plates use less material. And flexo's ability to print on recyclable and compostable substrates positions it well as brands move toward more sustainable packaging.
If you're setting up designs for any print project, Blank Templates from 4OVER4.COM give you properly formatted starting points that save time during file preparation.
Blank Templates
Pitfalls to Avoid with Flexographic Printing Projects
Even experienced designers make mistakes when preparing files for flexographic printing. Here are the most common ones that lead to wasted time and money:
Ignoring dot gain compensation. If you send the same file you'd use for offset or digital, your flexo prints will look darker and muddier. Always ask your printer for their specific dot gain curves and adjust your separations accordingly.
Specifying too-fine detail. Flexo handles impressive detail now, but there are still limits. Reverse text below 6pt, hairline rules under 0.5pt, and complex gradients in small areas can all fall apart on press. Design with the process in mind.
Choosing the wrong ink system for your substrate. Water-based ink on a non-porous plastic film won't adhere properly. Solvent ink on food-contact packaging might violate regulations. Always confirm ink compatibility before production starts.
Underestimating makeready costs on short runs. Flexo plates, press setup, and color matching take time. For runs under a few thousand units, digital printing from 4OVER4.COM often delivers better value. Know where the crossover point is for your specific project.
Print Products That Complement Flexographic Packaging
Once your flexographic printing handles the packaging side, you'll need supporting print materials to complete your brand presence. 4OVER4.COM offers 1,000+ products across categories that work alongside flexo-produced packaging - from labels and stickers to marketing collateral and promotional items.
For brands focused on sustainable packaging through flexographic printing, explore Green Printing options from 4OVER4.COM that align your marketing materials with your environmental commitments.
Here's a closer look at product specs, comparisons, and customer feedback for items that pair well with flexographic packaging projects:
| Characteristic | Description |
|---|---|
| Primary Method | A rotary relief printing process using flexible plates. |
| Best For | High-volume runs (thousands to millions of units). |
| Common Substrates | Flexible plastics, paper, cardboard, labels, foils. |
| Print Quality | High-quality, especially for solid colors and line art. |
| Cost Structure | Higher initial setup costs (plates), but very low cost per unit on long runs. |
| Speed | Extremely fast, making it one of the most efficient printing methods. |
| Factor | Flexographic | Offset Lithography | Digital Printing | Gravure |
|---|---|---|---|---|
| Best Run Length | Medium to Very Long | Medium to Long | Very Short to Medium | Extremely Long |
| Setup Cost | Medium to High | Medium | Very Low | Very High |
| Print Quality | Good to Excellent | Excellent | Very Good | Excellent |
| Substrate Variety | Widest Range | Primarily Paper/Board | Wide, but can be limited | Wide, best on smooth |
| Ideal Use Case | Labels, Packaging, Bags | Catalogs, Books, Posters | Custom Labels, Prototypes | Magazines, High-end Wraps |
- Speed and Efficiency: Flexo presses run at incredibly high speeds, making them perfect for long production runs where millions of identical items need to be printed fast.
- Material Versatility: It can print on a huge range of surfaces, both porous and non-porous. Think paper, cardboard, plastics, foils, and films.
- Durability: The inks are tough. They can stand up to abrasion, moisture, and fading, which is a must-have for product packaging that has to survive shipping and handling.
- It stops the colors from smudging or bleeding into each other.
- It lets the press run at its blistering top speeds without issue.
- It ensures the material is perfectly ready for the next color application right away.
- Water-Based Inks: These are environmentally friendly and are perfect for printing on porous materials like paper and corrugated cardboard. They're a popular choice for food packaging because of their low odor and safety.
- Solvent-Based Inks: Known for their excellent adhesion and durability, these inks are often used on non-porous materials like flexible films and foils. They are scratch-resistant and hold up incredibly well in harsh conditions.
- UV and EB Inks: These inks are "cured" (or dried) instantly using ultraviolet (UV) or electron beam (EB) light. This process allows for extremely fast press speeds and produces a durable, high-gloss finish that's perfect for high-end labels and packaging.
- Choose Digital for: Short runs, samples, personalized products, and lightning-fast turnaround on small orders.
- Choose Flexo for: High-volume, standardized runs where hammering down the cost-per-unit is the main goal.
- Blazing Speed: The consumer goods industry needs to pump out products by the million, and flexo presses are built for that kind of insane volume.
- Material Versatility: It sticks beautifully to the non-porous plastics and foils that are essential for keeping food fresh and safe.
- Food-Safe Inks: Flexo can use modern, food-grade, water-based inks that meet the stringent safety standards for anything that touches what we eat.
- Porous Materials: Think corrugated cardboard, paper bags, and kraft paper.
- Non-Porous Materials: This includes plastic films, shiny metallic foils, and cellophane.
- For a few hundred to a few thousand units: Digital printing will likely be your most affordable option.
- For tens of thousands to millions of units: Flexography is almost always going to give you the lowest cost per piece.
Your Flexographic Printing Questions Answered
What is flexographic printing used for most often?
Flexographic printing is used primarily for packaging - food wrappers, corrugated boxes, labels, shopping bags, and beverage cartons. It's the dominant method because it prints at high speed on substrates like plastic film, foil, and cardboard that other methods can't handle efficiently. Narrow-web flexo presses also produce the majority of pressure-sensitive labels worldwide.
How does flexographic printing differ from digital printing?
Flexo requires physical plates and press setup, making it cost-effective for long runs (typically 5,000+ units). Digital printing needs no plates, so it's better for short runs and variable data. Flexo runs faster and handles more substrate types. Digital offers quicker turnaround on small quantities. Your run length determines which method saves you money.
Can flexographic printing produce photo-quality images?
Modern HD flexo plates reproduce images at 175+ LPI, which approaches offset quality. You won't get the same sharpness as gravure or high-end offset on coated paper, but for packaging applications, today's flexo output looks excellent. Proper prepress work - especially dot gain compensation - is the key to getting the best results.
What inks does flexographic printing use?
Flexo uses three main ink types: water-based (best for paper and cardboard), solvent-based (best for plastic films and foils), and UV-curable (works on many substrates with instant curing). The right choice depends on your substrate, end-use environment, and any regulatory requirements like food-contact safety.
Is flexographic printing environmentally friendly?
Flexo has made big progress in sustainability. Water-based and UV-curable inks produce low or zero VOC emissions. Thinner photopolymer plates reduce material waste. The process also prints efficiently on recyclable and compostable substrates. For your complementary marketing materials, 4OVER4.COM's print options include eco-conscious stocks and processes.
How much does flexographic printing cost?
Upfront costs include plate production and press setup, which can range from a few hundred to several thousand dollars depending on the number of colors and plate sizes. Per-unit costs drop dramatically as volume increases. For runs over 10,000 units, flexo typically offers the lowest per-piece cost of any print method. Short runs are better served by digital printing.
Can I add QR codes to flexo-printed packaging?
Yes. Modern flexo presses reproduce QR codes reliably, but you need adequate size and contrast. Keep QR codes at least 1 inch square with strong color contrast against the background. Test print before full production. You can generate codes quickly with the QR Code Generator from 4OVER4.COM and include them in your packaging artwork files.