Table of Contents
- Home
- content hub
- Your Guide to Every Typical Banner Size for Print and Web
Your Guide to Every Typical Banner Size for Print and Web
Feb 1, 20262398 views
Feb 1, 20262398 views
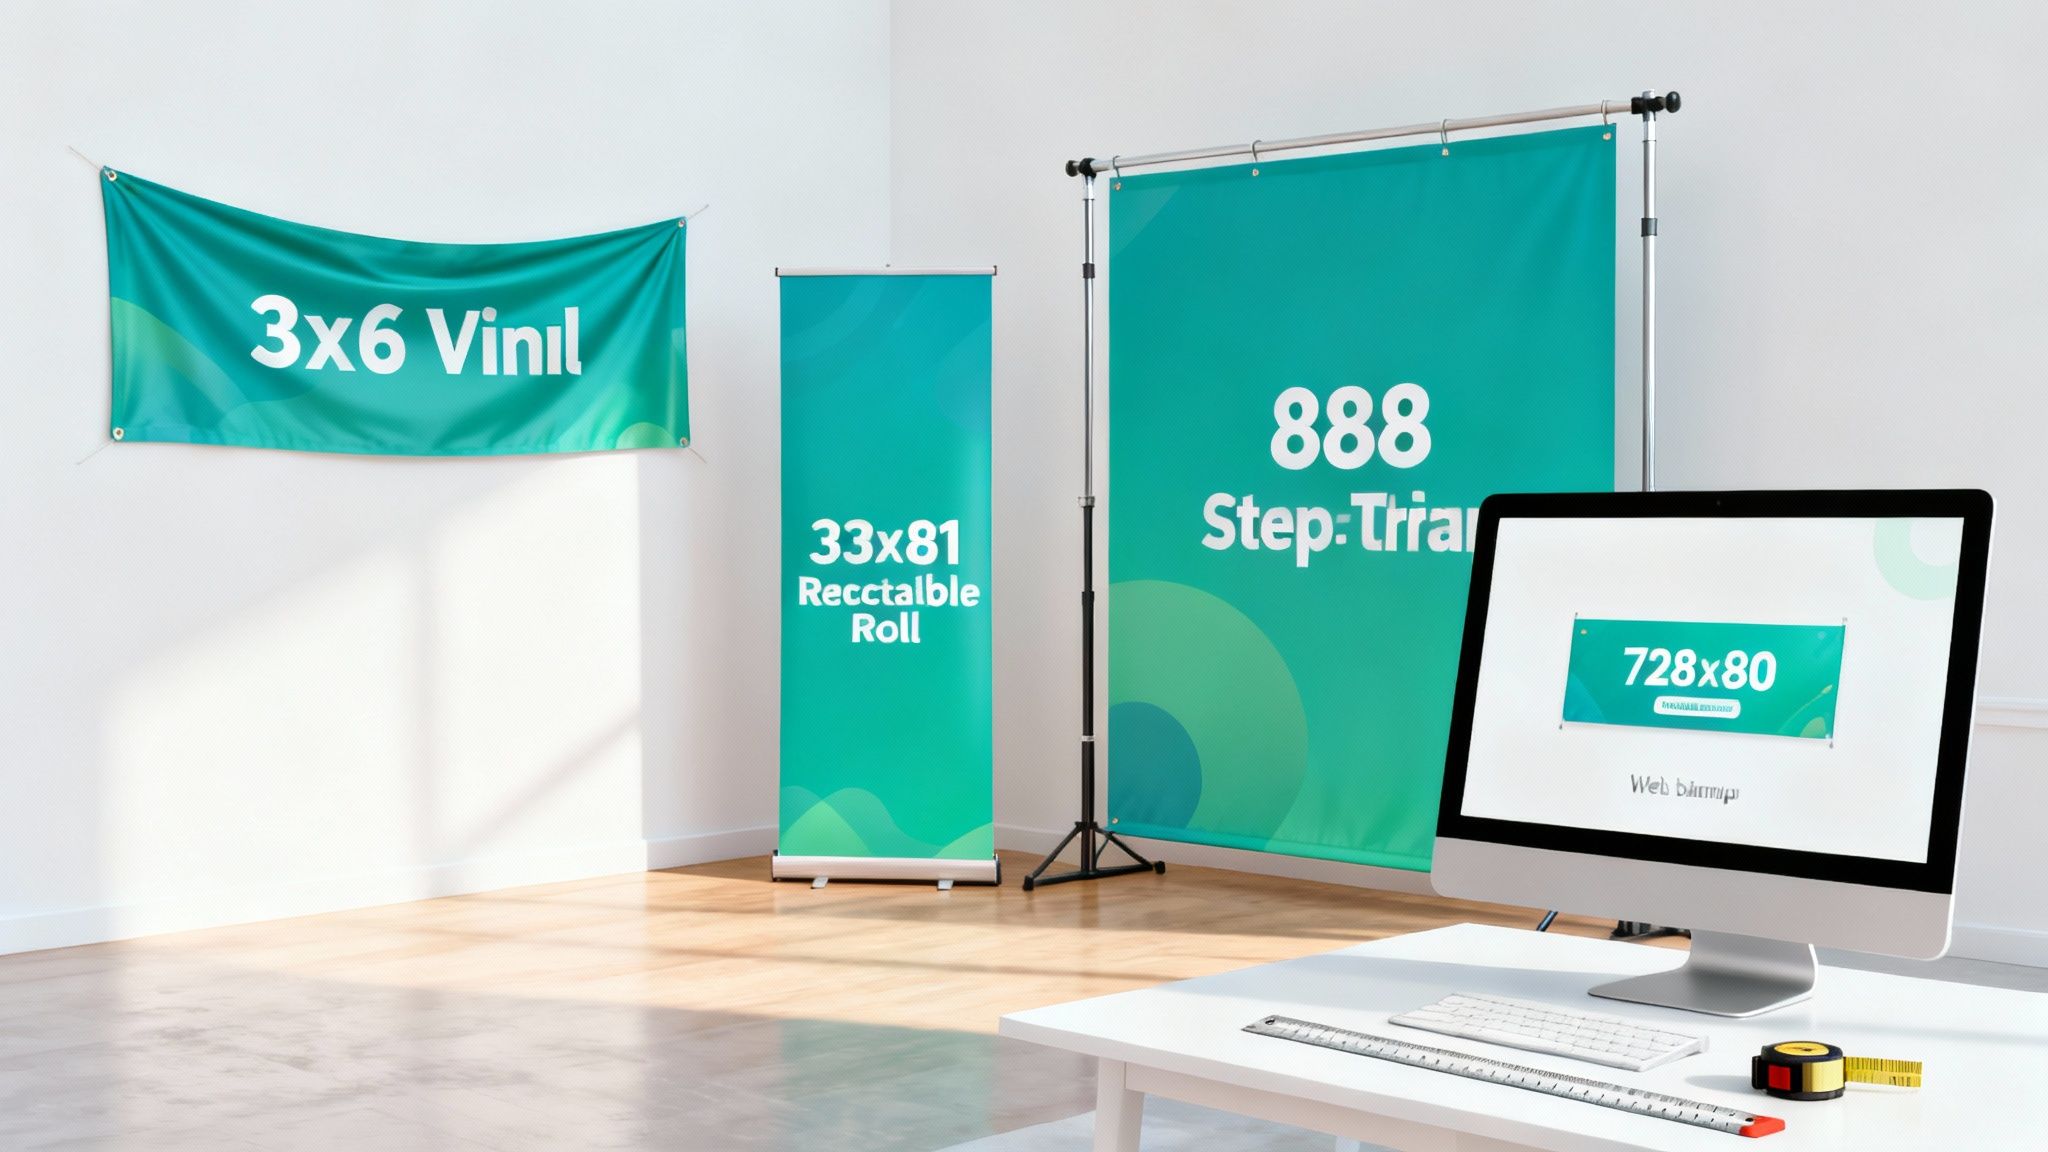
Staring at a wall of banner dimensions can feel a little overwhelming. But while there's no single "typical banner size" that works for everything, you can't go wrong starting with the classics. Options like a 3' x 6' vinyl banner for events or a 33" x 81" retractable banner for trade shows are popular for a reason—they just work. Picking the right size is all about matching your message to your location for the biggest impact.
Why Standard Banner Sizes Are a Smart Choice
Choosing a banner size can feel like you're just guessing, but it doesn't have to be that chaotic. Going with a standard or "typical" banner size is almost always the smartest, most cost-effective way to go. These aren't just random numbers; they're battle-tested dimensions that are optimized for visibility and designed to fit perfectly with common hardware like stands and hanging grommets.
Think of it like buying a picture frame. Sure, you could get a custom frame made for an odd-sized piece of art, but sticking to standards like 8x10 or 16x20 is way faster and cheaper. You know you'll find plenty of options off the shelf. The same idea applies to banners.
When you stick with a common size, you tap into some serious benefits:
- Faster Turnaround Times: Printers are already set up for these popular dimensions, making production quick and easy.
- Lower Costs: Standardized printing cuts down on waste and labor, and those savings get passed right on to you.
- Proven Effectiveness: These sizes are popular because they’ve been proven to work well in the real world.
- Easier Design Process: You'll find tons of templates for standard sizes, which takes all the guesswork out of setting up your files.
The Foundation of Effective Visual Marketing
Getting the dimensions and placement right is everything, much like how a detailed ultimate DTF sizing chart and placement guide is non-negotiable for anyone printing custom apparel. A well-chosen banner size makes sure your message isn't just seen—it’s understood. It’s the very foundation of a successful visual campaign.
This guide is your blueprint for making that powerful statement and getting a professional result every single time. It's no surprise the global flex banner market was valued at a whopping USD 7.69 billion in 2023; the industry is built on the efficiency of standardization. This just goes to show how picking the right marketing materials can give your visibility a major boost.
Choosing a standard banner size isn’t a limitation—it’s a shortcut to a professional, high-impact result. It eliminates guesswork, saves money, and ensures your message fits perfectly into the world it’s meant to influence.
Before we jump into the specific dimensions, let's cover a few key concepts. Understanding these basics will save you a ton of time and prevent those costly reprints we all want to avoid. We'll break down everything from print vs. digital specs to material choices, setting you up for a flawless finish.
Standard Print Banner Sizes for Maximum Impact
When you're diving into the world of print banners, knowing which dimensions work best in physical spaces is half the battle. Sure, you can always go custom, but there's a reason standard sizes are so popular. They hit that sweet spot of great visibility, cost-effectiveness, and compatibility with all the usual display hardware.
Think of this as your practical playbook for the most common print banner sizes, where we'll connect each format to its best real-world use. We'll kick things off with the heavy hitters of outdoor advertising and then move inside to cover the essentials for trade shows and events. By the end, you'll know exactly how to pick a banner that grabs attention, no matter where you put it.
This concept map helps break down the key decision points—print, digital, or material—that will steer you toward the right final size.
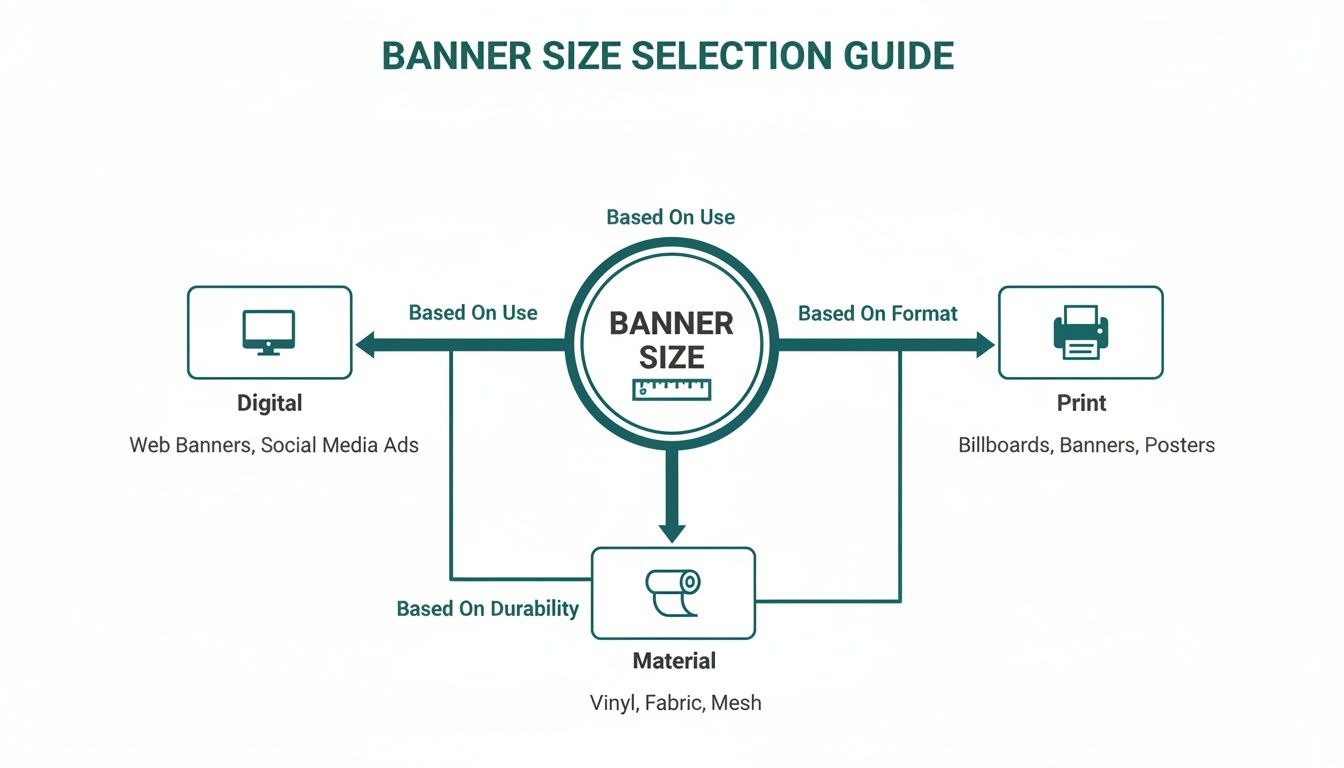
As you can see, choosing the right dimensions is all about understanding your medium and what your chosen material can do.
Outdoor Vinyl Banners: The Go-To for High Visibility
Need to make a big statement outdoors? Vinyl banners are the undisputed champs. They’re built tough, can handle the weather, and are designed to be seen clearly from a distance, making them perfect for everything from grand openings to sponsoring the local festival.
Here are a few of the most popular outdoor banner sizes and where they shine:
- 2' x 4' (24" x 48"): This compact size is perfect for smaller-scale promotions. Think of it for a farmer's market stall, a sponsorship sign at a Little League game, or a temporary "Now Hiring" sign in a shop window. It gets the job done without being overpowering.
- 3' x 6' (36" x 72"): This is what most people picture when they think "standard banner." The 3'x6' is incredibly versatile. It’s large enough to be easily read from across the street, making it ideal for event announcements, school fairs, and business promotions hung on a fence or wall.
- 4' x 8' (48" x 96"): When you need a bit more real estate for your message, this is a fantastic step up. Its solid size ensures it won't be missed on the side of a building, as a primary storefront sign, or as a main banner at an outdoor festival.
- 3' x 10' (36" x 120"): The wide, panoramic feel of this banner is perfect for stretching above a doorway for a "Grand Opening" or "Under New Management" announcement. It's also a great choice for spanning the top of a large trade show booth or running along a long fence line.
Across the U.S. sign and banner market, there's a constant demand for standard sizes like 2x6 feet for pole banners and 5x10 feet for fence wraps, which just goes to show how effective they are. This trend also lines up with the flex banner industry's projected growth to USD 13.89 billion by 2032, which is fueled by the need for quick, high-volume production for events and retail. In fact, banners make up a whopping 33.87% of all global printed signage, and standard sizing is a huge reason for their popularity.
Indoor Banners: Retractable and Step-and-Repeat
Once you move the action indoors, the game changes. People are viewing your banner from much closer, and portability suddenly becomes a huge deal. This is where specialized formats like retractable banners and step-and-repeat backdrops really come into their own. Feel free to check out our full range of custom vinyl banners to see which option is the right fit for your project.
Retractable Banners for Trade Shows and Lobbies
You might know them as roller banners or pull-up banners, but whatever you call them, they are an absolute must-have for any business that hits trade shows, conferences, or indoor events. They’re a breeze to transport, set up in seconds, and give you a polished, professional look instantly.
Key Insight: A typical banner size for retractable stands is 33" x 81". This dimension gives you a tall, lean canvas that’s perfect for showing off key branding, product features, or service offerings without hogging precious floor space.
Their vertical format naturally draws the eye upward, making them super effective in crowded expo halls or busy office lobbies.
Step-and-Repeat Backdrops for Photo Opportunities
If you've ever seen red-carpet photos, you've seen a step-and-repeat banner. These are large backdrops covered in a repeating pattern of logos, designed to create a branded background for photographers.
The most common sizes you’ll see are:
- 8' x 8' (96" x 96"): This square format is the industry standard. It's big enough to comfortably fit two to four people in a photo without the banner's edges showing up in the shot.
- 8' x 10' (96" x 120"): For larger groups, this slightly wider option is a better bet. It gives photographers a little more breathing room and flexibility.
At the end of the day, picking the right banner size comes down to matching the dimensions to the environment and your goal. Get that right, and your message won't just be seen—it'll be remembered.
Navigating the World of Web Banner Ad Sizes
When we move from the physical world of print to the digital space, a whole new rulebook for banner sizes comes into play. Just like with print, web banner dimensions are standardized. Why? To make sure ads show up correctly and look good across millions of different websites. Without these standards, online advertising would be absolute chaos.
The main organization setting these digital standards is the Interactive Advertising Bureau (IAB). Think of the IAB as the group that decides on the "picture frame" sizes for the entire internet. When you stick to their guidelines, you can be confident your ad will fit perfectly into the ad spaces available on blogs, news sites, and just about anywhere else online.
Let's break down the most common and effective web banner ad sizes, so you can picture where they appear and understand why they work so well.
The Most Powerful Web Banner Sizes
While there are dozens of ad sizes out there, a handful truly dominate the web because they consistently perform well and are widely available through ad networks like Google Ads. Focusing your energy on these top performers is simply the smartest way to spend your advertising dollars. If you're looking to really maximize your return, partnering with a specialized Display Advertising Agency can be a game-changer.
Here are the heavy hitters you absolutely need to know:
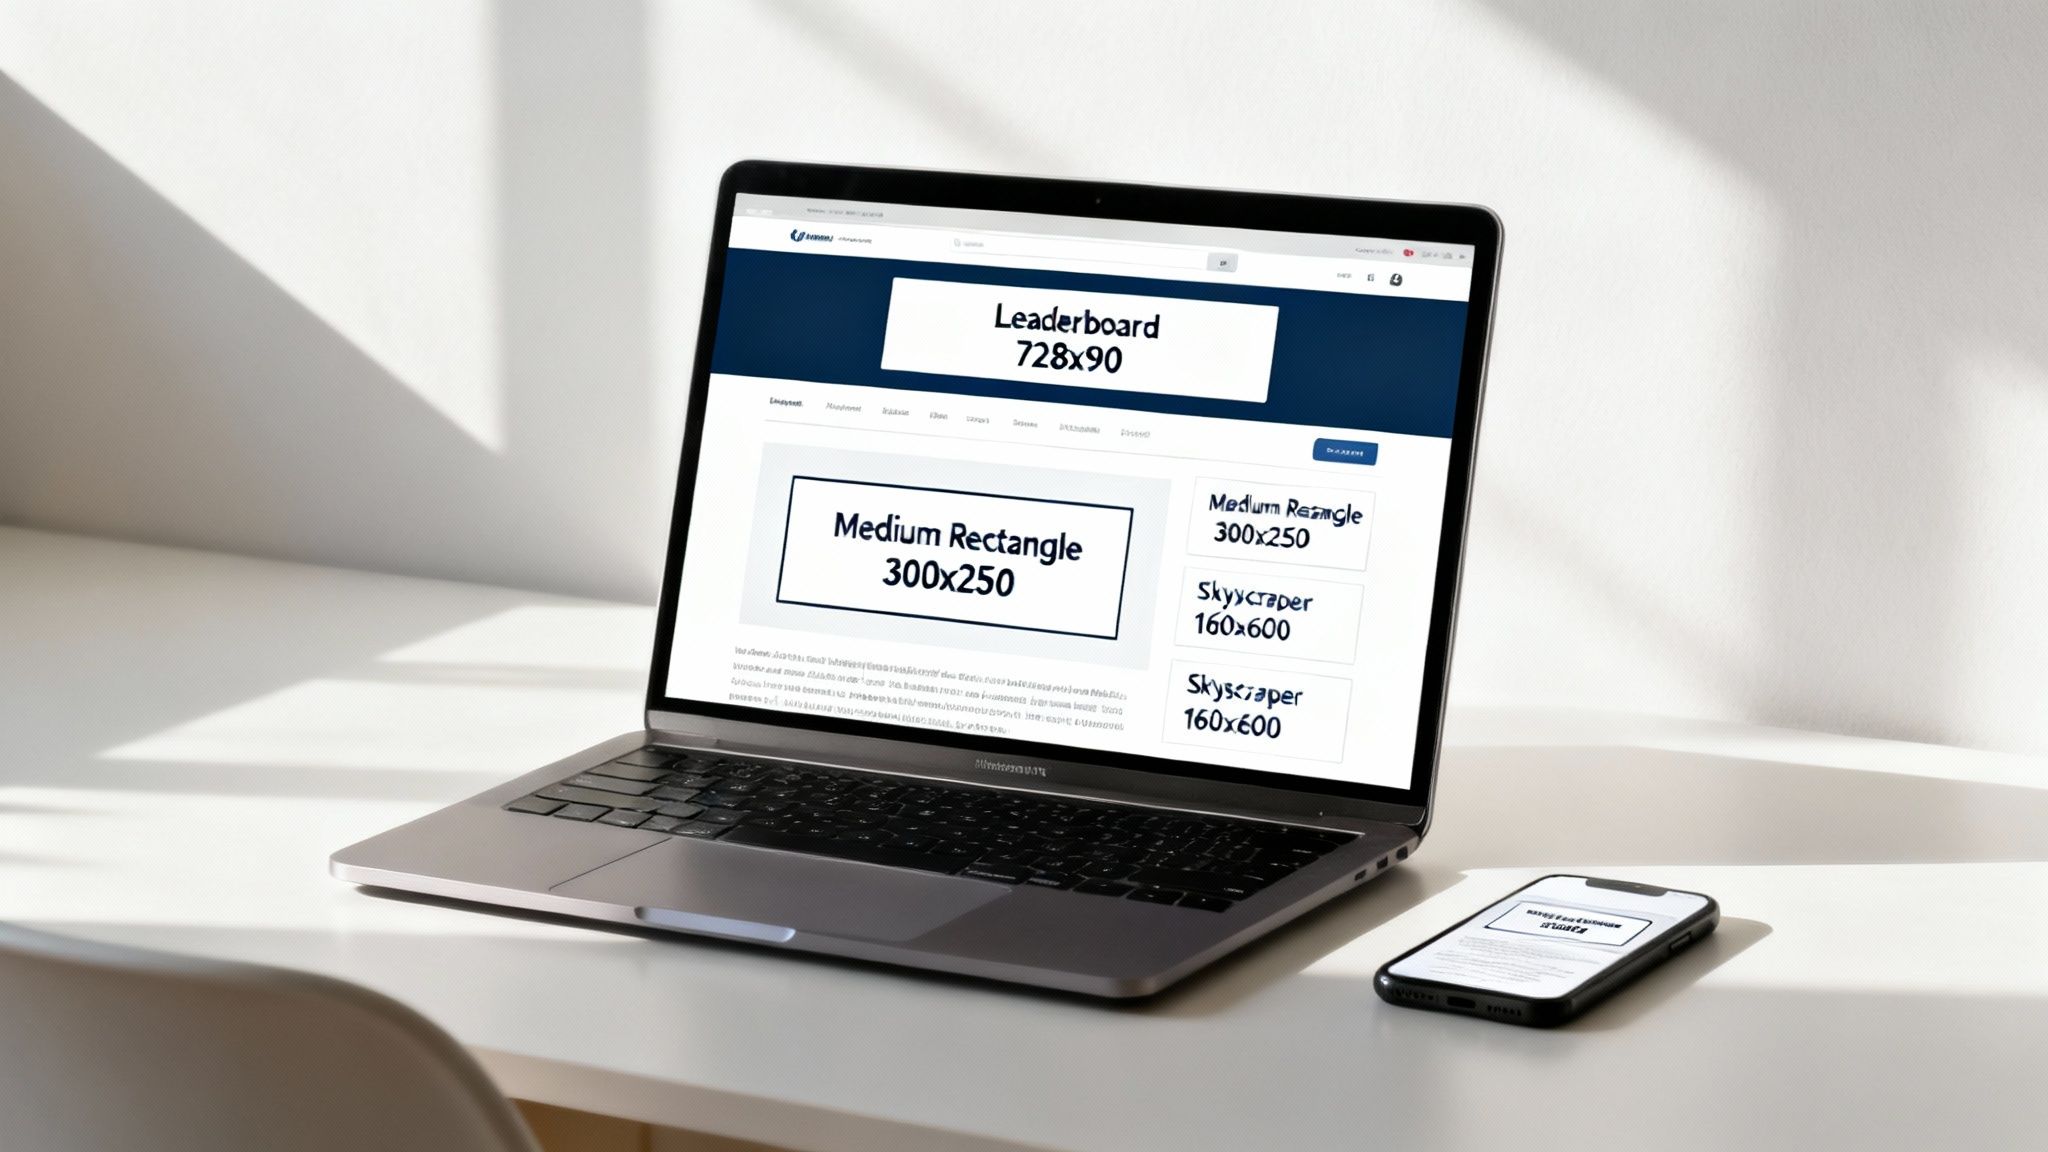
- Medium Rectangle (300 x 250 pixels): Often called the "M-Rec," this is one of the most popular ad sizes you'll find. It performs incredibly well when it's embedded within an article or at the end of a blog post, feeling like a natural part of the page.
- Leaderboard (728 x 90 pixels): This wide, horizontal banner is almost always placed at the very top of a webpage, right above the main content. Its prime real estate makes it a fantastic tool for building brand awareness.
- Wide Skyscraper (160 x 600 pixels): Tall and slim, the Skyscraper typically lives in the sidebars of a webpage. Its vertical layout gives you a generous amount of space for branding and compelling ad copy.
- Large Rectangle (336 x 280 pixels): A slightly bigger cousin to the Medium Rectangle, this size gives you more visual real estate. That extra space can often lead to higher engagement, especially when placed within content.
The 300x250 Medium Rectangle is a true powerhouse, accounting for a huge portion of all display ad impressions around the globe. Its versatility and effectiveness make it an essential format for almost any digital campaign.
Getting a handle on these key sizes is the first step toward creating online campaigns that actually work. Each one has a different strategic purpose based on where it’s placed and how a user interacts with it.
Visualizing Placement and Performance
To really get a feel for their impact, it helps to imagine where these banners live on a typical website. The Leaderboard (728x90) is like the main banner at a press conference—it’s the first thing you see at the top, immediately making a statement.
The Medium Rectangle (300x250), on the other hand, is more like a well-placed product feature in a magazine article. It sits comfortably next to the text, catching your eye as you scroll without being too disruptive. It’s so effective because it appears right when a user is already engaged with the page's content.
And finally, the Skyscraper (160x600) acts like a column in a newspaper, running vertically down the side. It stays in the user's peripheral vision, serving as a constant brand reminder as they move down the page.
Here’s a quick breakdown of their strategic roles:
| Banner Size | Best For | Common Placement |
|---|---|---|
| Leaderboard (728x90) | High-impact brand awareness | Top of the page (above the fold) |
| Medium Rectangle (300x250) | High click-through rates | Embedded within article content |
| Skyscraper (160x600) | Persistent brand messaging | Sidebars of web pages |
When you design your ads for these specific, high-performing sizes, you're making sure your message gets seen in the right place at the right time. For more great ideas on how to boost your brand, check out our guide on essential marketing essentials that can work alongside your digital efforts.
Getting Your Banner File Ready for Printing
Choosing the perfect banner size is a huge first step, but a killer design needs a rock-solid file to match. Getting your design file ready for printing might sound super technical, but it really boils down to a few core concepts. Nail these, and what you see on your screen will be exactly what you get in your hands.
Think of it this way: you wouldn't build a house without a blueprint. Your print file is the blueprint for your banner. Getting the specs right from the start is the best way to prevent costly mistakes and make sure your message looks sharp, vibrant, and professional.
Understanding Resolution for Crisp Images
Ever seen a printed banner that looked fuzzy or pixelated up close? That’s almost always a resolution issue. Resolution is measured in DPI (Dots Per Inch), and it basically determines the sharpness of a printed image. A higher DPI means more tiny dots of ink are packed into every inch, creating a crisp, detailed picture.
For images on a website, a low resolution like 72 DPI is fine because screens just don't need that much detail. For print, however, that number is way too low.
Key Takeaway: For professional-quality banners, your file's resolution should be between 150 and 300 DPI at its final print size. This range is the industry gold standard for ensuring your graphics and text are perfectly sharp, even on a massive banner.
Trying to print a low-resolution file is like stretching a small photo to fit a huge frame—the image just falls apart. Always start your design with the correct resolution settings from the get-go to avoid this common trap.
The Importance of Bleed and Safe Area
Next up are the two most important margins in your design: the bleed and the safe area. These are absolutely critical for a clean, professional finish because they account for the physical cutting process during production.
Quick Guide to Banner Print Specifications
Before you export that final file, run through this checklist. It’s a simple way to double-check that your banner is perfectly prepped for professional printing and will come out looking exactly as you planned.
| Specification | Recommended Setting | Why It Matters |
|---|---|---|
| Resolution | 150-300 DPI at full size | Ensures all images and text are sharp and clear, preventing pixelation. |
| Color Mode | CMYK | Matches the ink colors used by printers for accurate color reproduction. |
| Bleed | 0.125" (1/8") on all sides | Prevents ugly white edges by giving the cutter a small margin for error. |
| Safe Area | 0.125" (1/8") inside trim | Protects your critical text and logos from being accidentally trimmed off. |
| File Format | Press Quality PDF | The universal standard that locks in all fonts, images, and layout elements. |
Getting these settings right from the beginning is the secret to a stress-free printing process and a final product you’ll be proud of.
Bleed: Your Design’s Safety Net
Imagine a giant, powerful cutting machine trimming your freshly printed banner. It's incredibly precise, but tiny shifts can happen. The bleed is a small, extra margin of your background color or image that extends beyond the final trim line.
- What it is: Typically, a 0.125" (1/8 inch) to 0.25" (1/4 inch) border added to each side of your design.
- Why it matters: If the blade shifts just a millimeter, it cuts into this extra colored area instead of leaving an unfinished white sliver along the edge. It’s your design’s safety net.
Safe Area: The VIP Zone
On the flip side, the safe area (or safety margin) is an inner boundary where you should keep all your most important elements. Think of this as the "safe zone" for your message.
- What it is: A margin set just inside the final trim line, usually 0.125" to 0.25".
- Why it matters: Placing your text, logos, and key graphics within this area guarantees they won't get accidentally clipped during the finishing process.
Here's an easy way to remember it: think of the trim line as a fence. The bleed is the grass growing a little bit past the fence, and the safe area is where you keep the playground equipment—well away from danger. Both work together to make sure nothing important gets cut off.
Choosing the Right Color Mode and File Format
Finally, let's talk about the finishing touches on your print-ready file: color mode and file format. These small details have a massive impact on how your banner looks in the real world.
CMYK for Print, RGB for Screens
Your computer screen creates colors by mixing Red, Green, and Blue light—this is the RGB color mode. Printers, on the other hand, create colors by mixing physical inks: Cyan, Magenta, Yellow, and Black. This is known as the CMYK color mode.
Because they use totally different methods to create color, their available color ranges (or "gamuts") aren't the same. If you design in the vibrant RGB mode, you might be disappointed when those bright colors look a bit duller in print. To ensure your colors are accurate, always set your design software's color mode to CMYK for any print project.
Best File Formats for Banners
While you can submit various files, some are much better than others for preserving quality and ensuring a smooth printing process.
- PDF (Press Quality): This is the undisputed champion. It’s the universal standard that embeds your fonts, images, and vector elements into one neat, reliable package.
- AI or EPS: If your design is heavy on logos and text, these vector formats are fantastic. They can be scaled to any size—from a business card to a billboard—without losing a shred of quality.
- TIFF: For banners that feature large, high-quality photographs, TIFF is a great choice. It’s a "lossless" format, meaning it preserves every bit of image detail without compression.
By paying attention to resolution, bleed, color mode, and file format, you’re taking full control of your project's final quality. For even more options, you can explore our full range of online large format print solutions to find the perfect match for your vision.
Choosing the Right Materials and Hardware
The perfect banner size is a great start, but it won't hit its full potential without the right foundation. A banner's material and hardware are just as critical as its design, dictating not only how it looks but how long it lasts and where it can hang. Getting this part right ensures your investment looks sharp and stands up to whatever you throw at it.
Think of it like choosing a coat. You wouldn't wear a light windbreaker in a snowstorm, right? You'd grab a heavy-duty parka. Banner materials work exactly the same way—each one is built for a specific job. Pick the right one, and your banner will perform flawlessly, whether it’s in a quiet lobby or facing a blustery day head-on.
Selecting the Best Banner Material
Let's walk through the three most common materials you'll encounter. Each has its own strengths, so matching the material to your use case is the name of the game.
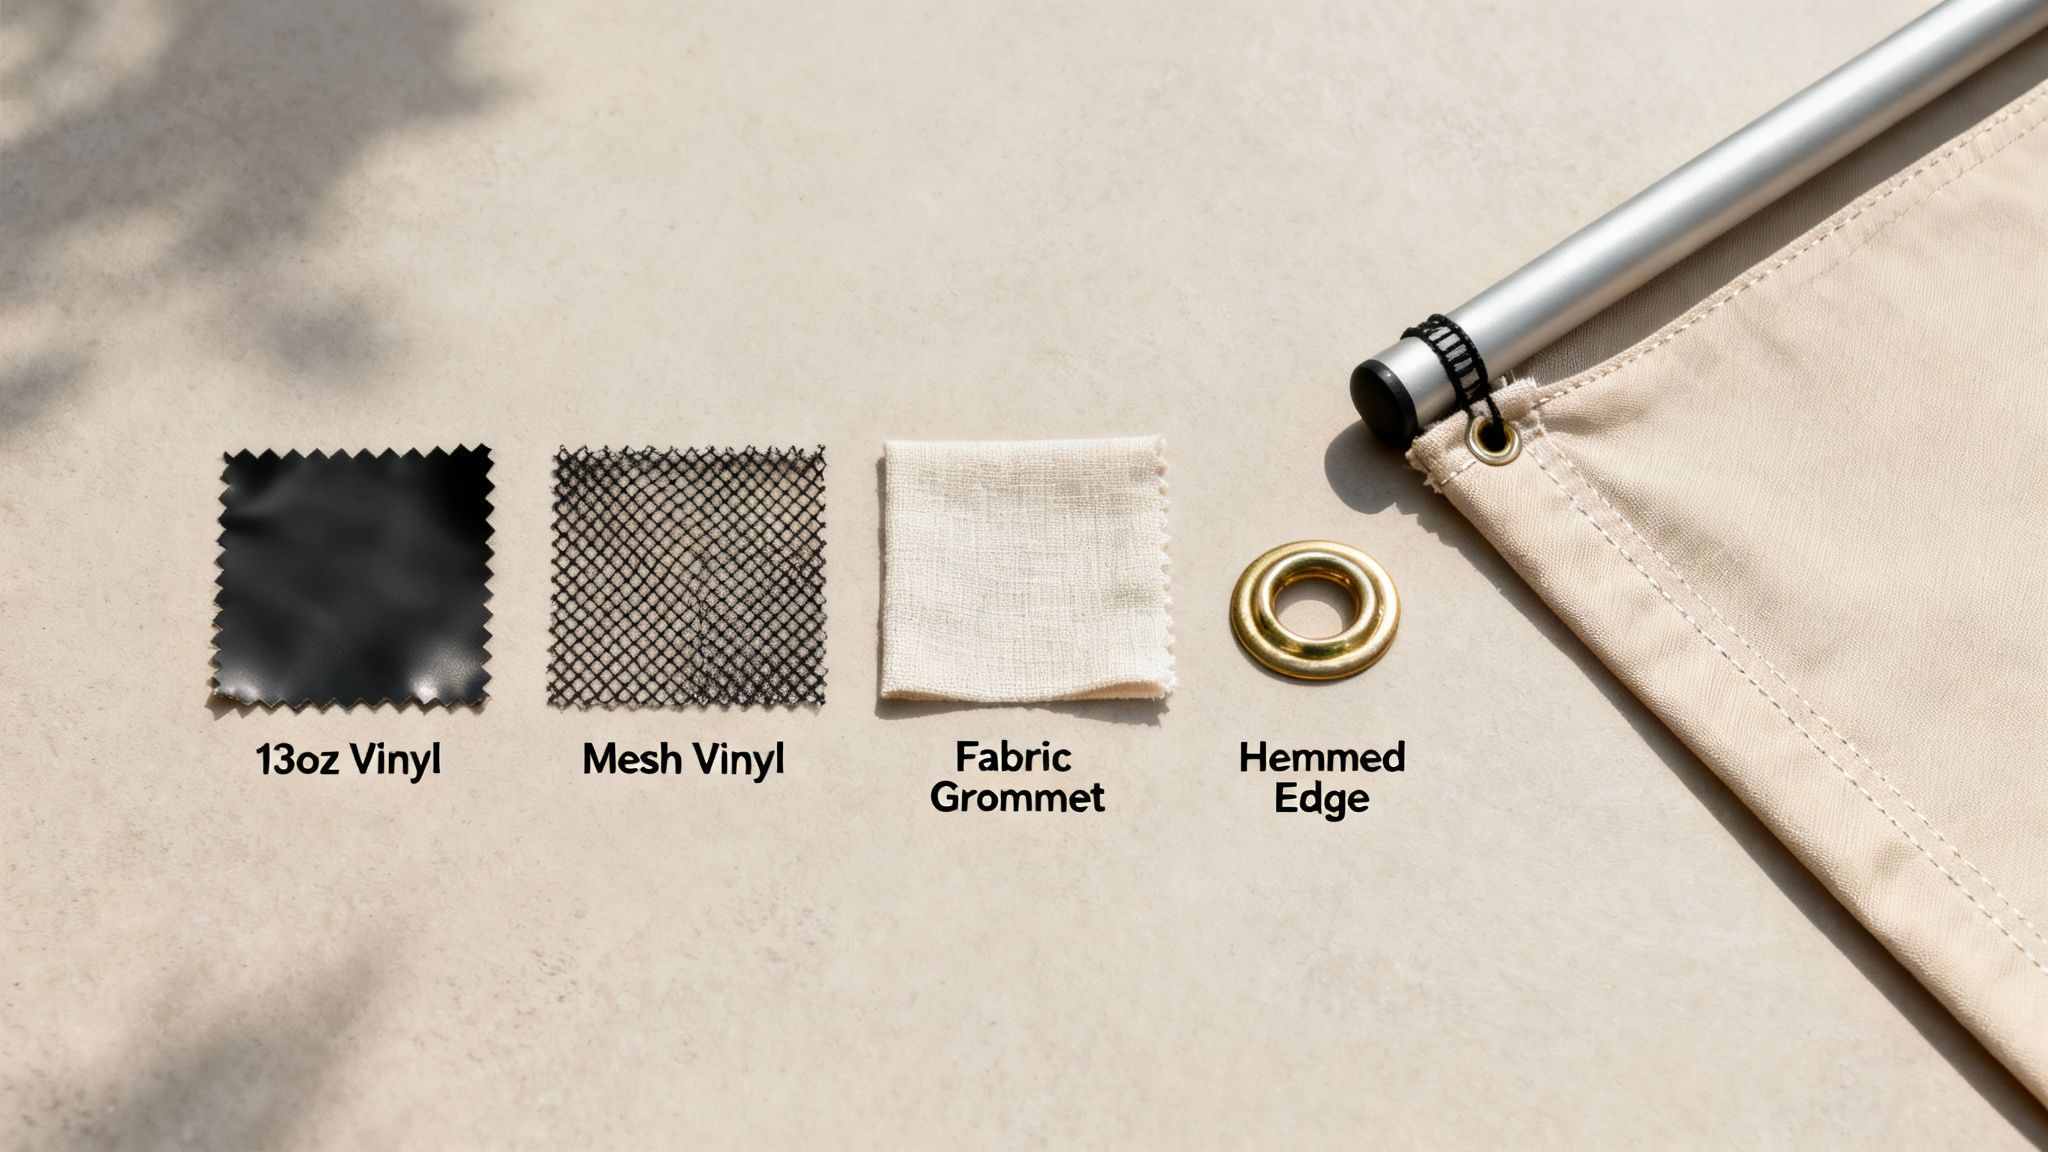
- 13oz Vinyl: This is the workhorse of the banner world. It's tough, weather-resistant, and gives you a smooth canvas for brilliant, eye-popping graphics. Its solid all-around performance makes it the go-to for most indoor and outdoor jobs, from storefront sales to event backdrops.
- Mesh Vinyl: Built for windy spots, mesh vinyl is a total game-changer for outdoor banners. The material is peppered with thousands of tiny holes, which lets the wind pass right through instead of turning your banner into a giant sail. This dramatically cuts down on strain and prevents tearing, making it the only real choice for fences, construction sites, and breezy outdoor events.
- Fabric: For a touch of class indoors, you can't beat fabric. It delivers a premium, glare-free finish that looks incredibly sophisticated up close. It’s the perfect fit for high-end retail displays, media walls, and trade show booths where you need a refined, professional look.
Choosing mesh vinyl for a banner on a windy fence isn't just a suggestion—it's a necessity. A standard vinyl banner can act like a sail, putting immense stress on its grommets and the fence itself, leading to damage. The airflow from mesh prevents this entirely.
Understanding Finishing and Hardware Options
Finishing options are the final touches that get your banner ready for prime time. They reinforce its structure and give you secure ways to hang it. The hardware you pick, from simple grommets to full stands, will determine how and where you can display your message.
Here are the essential finishing touches you need to know:
- Hemming: This is where we fold over the banner's edges and heat-weld them shut. Hemming creates a super-strong, reinforced border that dramatically boosts durability and stops the edges from fraying or tearing over time, especially outdoors.
- Grommets: These are the metal rings punched into the hemmed edges. They give you strong, reliable anchor points for hanging your banner with rope, zip ties, or hooks. Standard placement is usually every two to three feet around the banner.
- Pole Pockets: Just like the name sounds, these are pockets sewn along the top and/or bottom edges of the banner. They’re designed to slide over a pole or rod, which pulls the banner taut for a clean, flat display. This is the go-to for parade banners and many hanging displays.
For portable and indoor displays, specialized hardware like banner stands offers a complete, all-in-one solution. You can explore a variety of professional banner stands and printing options to find the perfect setup for your next event. By pairing the right material with the right hardware, you ensure your banner is not just visually stunning but perfectly equipped for its environment.
Got Questions About Banner Sizes? We've Got Answers.
Jumping into the world of banner printing usually stirs up a few questions, and that's completely normal. Whether you're a marketing pro or ordering your very first sign, getting the details right is key to a smooth project. This is where we clear up the most common questions we hear, giving you quick, straight-to-the-point answers so you can order with confidence.
Our goal here is to take the mystery out of the technical stuff, letting you focus on what really matters: creating a killer message that turns heads.
What’s the Most Popular Banner Size for a Small Business?
Hands down, the 3' x 6' vinyl banner is the workhorse for small businesses. It hits that perfect sweet spot between being highly visible and budget-friendly, which makes it incredibly versatile. This size is big enough to shout "Grand Opening!" from your storefront but still manageable enough to pack up for a trade show or a local farmer's market.
The dimensions give you plenty of real estate for a bold headline, your key info, and a logo without everything feeling squished. If you need a reliable, do-it-all banner to get started, you really can’t go wrong with the 3' x 6' format. It’s a smart choice that looks professional just about anywhere you put it.
What Resolution Do I Need for a Really Big Banner?
This is a classic point of confusion, but the answer really boils down to one thing: viewing distance. For those massive banners that people will see from far away—think hanging on the side of a building or as a stage backdrop—you can actually get away with a lower resolution of 100-150 DPI. From a distance, our eyes naturally blend the pixels together, making the image look perfectly sharp.
But for any banner that people will see up close, like inside a retail store or at your event booth, you have to stick to the gold standard of 150-300 DPI. That higher resolution is what keeps every little detail, from fine print to crisp photos, looking sharp even when someone is standing right next to it.
Pro Tip: Don't fall into the trap of thinking higher DPI is always better for huge prints. A 100 DPI file for a billboard is perfectly fine and keeps your file size from getting gigantic. A 300 DPI file in that scenario would be massive and offer zero visual benefit from the road.
Can I Use the Same File for My Print and Web Banners?
Nope, you'll definitely want to create separate files for each. The technical needs for print and web are just too different, and trying to use one for the other will cause problems.
- Print Banners: These need high resolution (150-300 DPI) and must be in a CMYK color profile. This matches the four-color ink process that professional printers use.
- Web Banners: These need a much lower resolution (72 DPI) and an RGB color profile so they display correctly on screens and, just as importantly, load fast.
If you send a web file to print, you’ll get a blurry, pixelated mess. On the flip side, using a print file online will make your website crawl and could even make your colors look off. Always prep two separate versions for the best results.
At 4OVER4, our mission is to make your print projects a total success. Take a look at our huge range of custom banner options and find the perfect way to make your next big announcement.
More from

25
If you've ever wondered about the standard gift card dimensions, there’s one number you need to know: CR80
![]() Emma Davis
Emma Davis
Mar 17, 2026

32
When you’re launching a product, your bottle label is often the first thing a customer sees. Think of it as your silent salesperson
![]() Emma Davis
Emma Davis
Mar 16, 2026

78
When you're brainstorming ideas for landscaping business cards, it helps to think beyond just contact information. Your c
![]() Emma Davis
Emma Davis
Mar 15, 2026

202
When you think of a yard sign, the classic 18"x24" is probably what comes to mind. It’s the industry workhorse fo
![]() Emma Davis
Emma Davis
Mar 14, 2026

126
When you’re ready to invest in an A-frame sign, the first question you'll ask is, "What size do I need?" It usually comes down
![]() Emma Davis
Emma Davis
Mar 13, 2026

1190
The real secret to mastering your direct mail budget isn't complicated. It comes down to one simple fact: a standard 4" x 6&q
![]() Emma Davis
Emma Davis
Mar 12, 2026

156
Tear-off flyers are a classic for a reason. They’re a tangible marketing tool, designed with perforated, removable tabs at the bottom. Each
![]() Emma Davis
Emma Davis
Mar 11, 2026

276
Printing stickers at home is a seriously fun and rewarding project. It boils down to four main parts: designing your image, picking the right
![]() Emma Davis
Emma Davis
Mar 10, 2026