What You Need to Know About Typical Banner Sizes
Typical banner sizes range from compact 2' x 4' indoor displays to large 4' x 10' outdoor formats. The most popular choice for storefronts is 3' x 6', while trade show retractable banners sit at 33" x 81". Your ideal size depends on viewing distance, placement, and purpose. 4OVER4 has printed 10 billion+ cards and print products across 1,000+ product types, so we know which sizes work and which ones waste your money.
Why Getting Your Banner Dimensions Right Matters
Here's the thing about typical banner sizes - there's no single "standard." But certain dimensions keep showing up because they just work. A 3' x 6' vinyl banner is the workhorse of storefront advertising. A 4' x 8' banner dominates outdoor events. And the 33" x 81" retractable banner? That's basically the uniform of every trade show booth in America.
Picking the wrong size means your message gets lost. Too small for an outdoor fence, and nobody reads it. Too large for a lobby, and it looks ridiculous. This guide breaks down every common banner dimension by use case so you can order with confidence. 4OVER4 backs every order with a Price Match guarantee, so you're getting the best deal on whatever size you choose. And if you're working on other print projects between banner orders, check out our guide on How To Clean Rubber Stamps for maintaining your stamp collection.
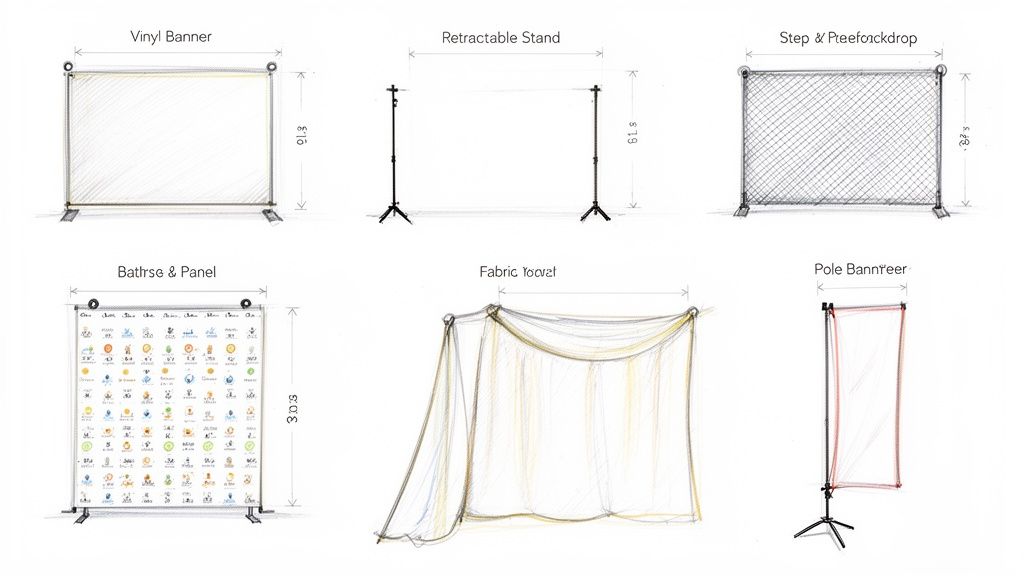
A Complete Breakdown of Banner Sizes by Type and Use Case
Banner sizing isn't complicated once you understand the logic behind it. Every dimension exists for a reason - a specific distance, a specific venue, a specific job. Let's walk through the categories so you can match the right size to your project without guessing.
Small Indoor Banners: 2' x 4' and 2' x 6'
Small banners in the 2' x 4' (24" x 48") and 2' x 6' (24" x 72") range are your go-to for indoor point-of-sale displays, directional signage, and tabletop backdrops. They fit tight spaces like retail aisles, reception areas, and small event booths without overwhelming the room.
At 2' x 4', you've got enough real estate for a logo, a headline, and maybe a short tagline. Bump up to 2' x 6' and you can add more detail - a phone number, website, or QR code. These sizes work well when viewers are standing 3 to 10 feet away. Any farther and you'll want something bigger.
If you're designing marketing materials for tight spaces, you might also find our guide on How To Make Flyers useful for complementary print pieces.
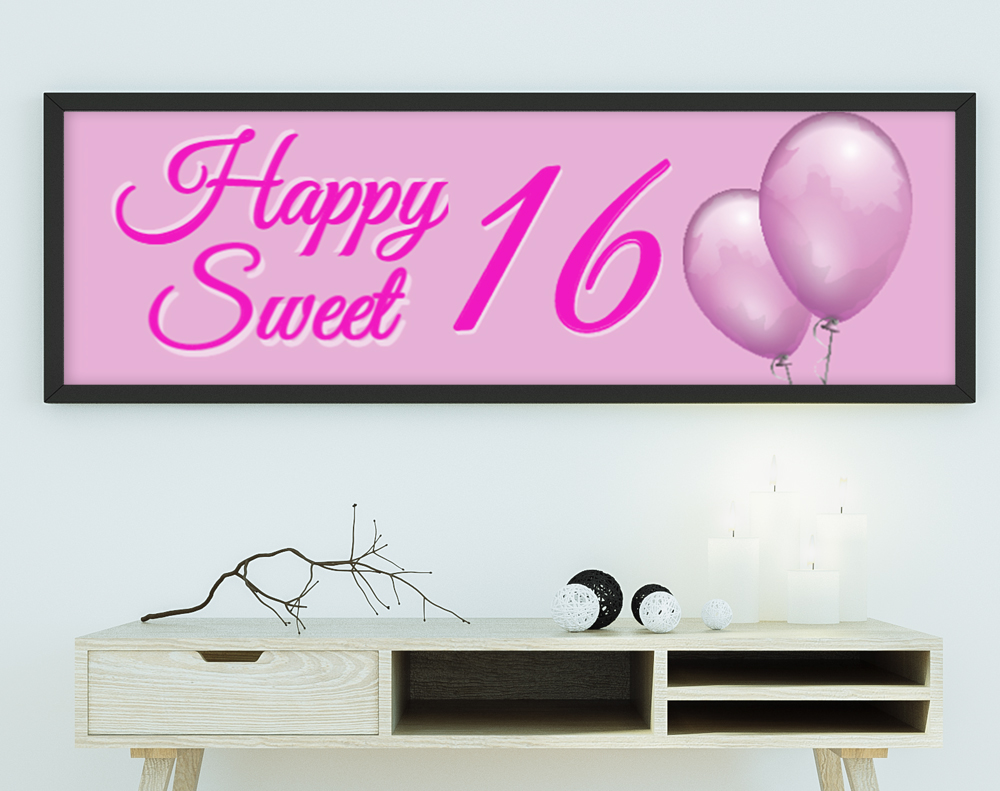
Medium Banners: 3' x 6' and 3' x 8'
The 3' x 6' (36" x 72") banner is probably the single most popular banner size in commercial printing. It's the sweet spot - big enough to read from across a parking lot, small enough to hang on a storefront without a construction crew. Restaurants, salons, gyms, and retail shops order this size constantly.
Step up to 3' x 8' (36" x 96") and you get extra horizontal space for longer messages. This is the size you want when you need to list multiple services, display event schedules, or show a panoramic image. Both sizes work indoors and outdoors, though outdoor use calls for heavier vinyl material and reinforced grommets.
The 3-foot height is comfortable at eye level when hung on a wall or fence. Text at 3 inches tall or larger stays readable from about 30 feet away on these banners. Keep that ratio in mind when you're laying out your design.
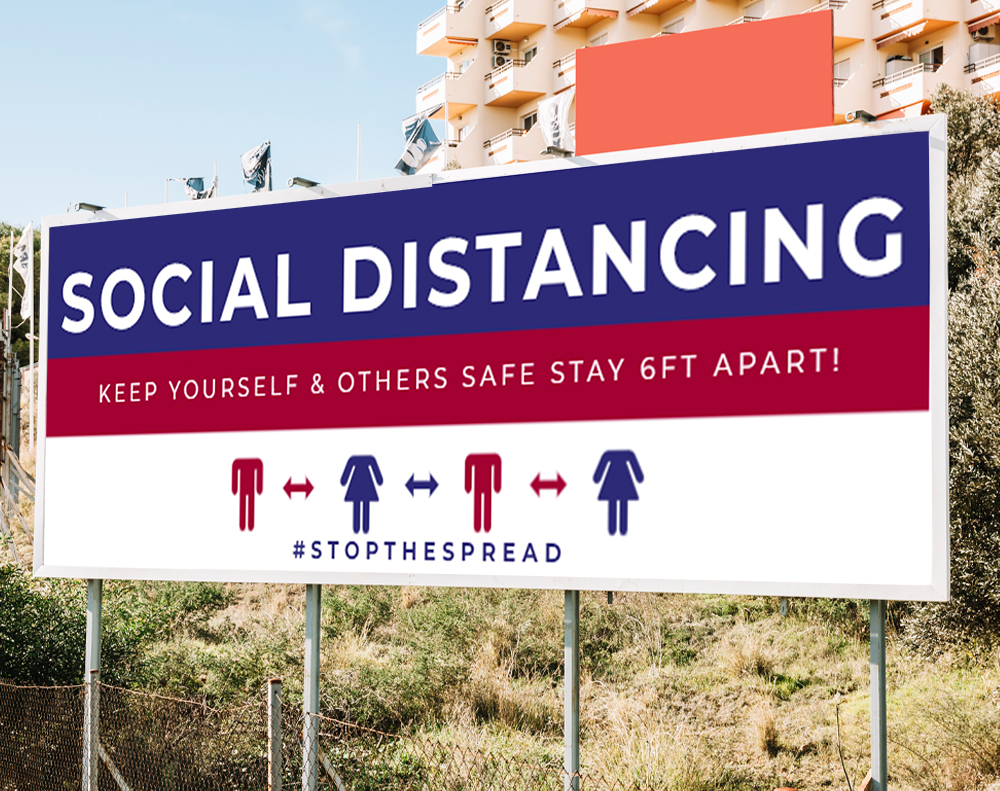
Large Outdoor Banners: 4' x 8' and 4' x 10'
When you need to grab attention from a distance - think highway-adjacent businesses, construction sites, or large outdoor festivals - the 4' x 8' (48" x 96") and 4' x 10' (48" x 120") sizes deliver. These are serious banners for serious visibility.
A 4' x 8' banner matches the dimensions of a standard sheet of plywood, which makes it easy to mount on temporary structures or building facades. The 4' x 10' gives you even more room for high-impact graphics. At these sizes, your headline text should be at least 4 to 6 inches tall for readability at 50+ feet.
For events where you need visibility from both directions, consider 2 Sided Blockout Banners that display your message on both faces without bleed-through. They're built with an opaque layer between two print surfaces.
"We ordered 4' x 8' vinyl banners for our grand opening and people were stopping their cars to look. The colors were vivid and the material held up through two weeks of rain."
- Marcus T., restaurant owner
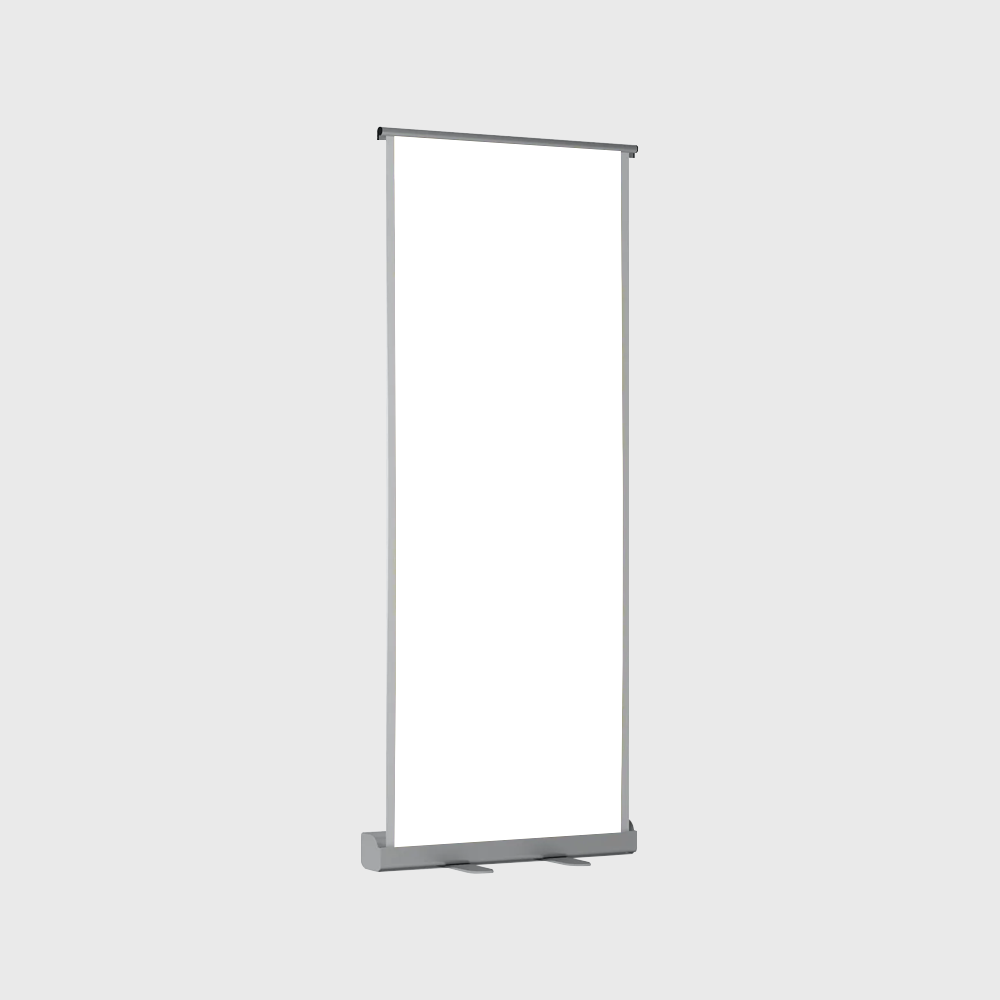
Retractable Banner Sizes: The Trade Show Standard
Retractable (or roll-up) banners have their own sizing conventions. The most common retractable banner size is 33" x 81" (about 2.75' x 6.75'). This has become the industry standard for trade shows, conferences, lobbies, and anywhere you need a professional portable display.
Other popular retractable sizes include 24" x 81" for tighter booth spaces and 47" x 81" for wider displays. The height stays consistent because the retractable mechanism is engineered around that dimension. The width is where you have flexibility.
Retractable banners set up in under 60 seconds with no tools. They come in a carrying case. They travel well. That's why they're everywhere at business events. If you're also preparing brochures for your trade show booth, our guide on How To Fold A Brochure covers the most effective fold styles.
Vertical and Street Pole Banners
Street pole banners (also called avenue banners or light pole banners) have specific sizing requirements. The most typical dimensions are 24" x 48" and 30" x 60". These are the vertical banners you see hanging from light poles in downtown districts, college campuses, and event venues.
Cities and municipalities often have strict size regulations for pole banners, so always check local requirements before ordering. The banners need pole pockets or grommets at top and bottom to attach to the mounting hardware. Wind load is a real concern at these heights, so the material needs to be durable and properly finished.
These vertical formats also work well as hanging banners inside convention centers, churches, and large retail spaces. The narrow vertical orientation draws the eye upward and creates a sense of importance.
Mesh Banners for Windy Locations
If your banner is going on a fence, building scaffold, or any high-wind area, mesh banners are the answer. They come in the same typical banner sizes as solid vinyl - 3' x 6', 4' x 8', 4' x 10', and custom dimensions - but the material has tiny perforations that let wind pass through.
This matters more than you'd think. A solid 4' x 10' banner in a 30 mph wind creates enormous force on its mounting points. Mesh reduces that wind load by roughly 30-40%, which means fewer torn grommets and longer banner life. The trade-off is slightly reduced print vibrancy, but modern mesh printing has gotten impressively sharp.
Custom Banner Sizes: When Standard Won't Cut It
Sometimes your space demands something non-standard. A 20-foot-wide stage backdrop. A narrow 18" x 8' hallway banner. A 5' x 5' square for a photo booth background. Custom sizing is where 4OVER4 really shines - you're not locked into preset dimensions.
When ordering custom sizes, provide the exact measurements of your display area. Leave at least 2 inches of margin on all sides for grommets or pole pockets. And always request a proof before printing to make sure your design scales properly to the non-standard dimensions.
For design files at any size, grab the correct specifications from our Blank Templates library. Starting with the right template dimensions prevents scaling headaches later. You can also browse the Faq Hub for more printing tips across all product types.
How to Choose the Right Size for Your Project
Here's a simple framework. Ask yourself three questions:
- Where will it hang? Indoor spaces under 1,000 sq ft - go with 2' x 4' to 3' x 6'. Outdoor or large venues - 4' x 8' or bigger.
- How far away are viewers? Under 15 feet, small banners work fine. Over 30 feet, you need at least 3' x 6'. Over 50 feet, go 4' x 8' or larger.
- What's your message density? Simple logo and tagline? Smaller works. Event schedule with multiple details? You need more surface area.
Don't forget about complementary marketing materials. If you're setting up for an event, you might want Custom Magnets Faq as giveaways or How To Make Envelopes for direct mail campaigns that drive traffic to your banner display.
"I was torn between a 3' x 6' and 4' x 8' for our church fundraiser. Went with the 4' x 8' and it was the right call - people could read it from the road. Worth every penny."
- Diana L., event coordinator
Here are some real examples of banners our customers have created at various typical banner sizes to give you a sense of what's possible.
Need to start designing? These banner templates cover the most popular dimensions and are ready to customize.
You can also download blank templates sized to exact print specifications for the most common banner formats.
Blank Templates

Sizing Mistakes That Waste Your Banner Budget
Even experienced marketers get tripped up on typical banner sizes. Here are the errors 4OVER4 sees most often - and how to avoid them.
Ordering too small for the viewing distance. A 2' x 4' banner looks great in your office. Hang it outside on a building and it disappears. Always measure the actual viewing distance before choosing a size. If people are more than 20 feet away, go bigger than you think you need.
Ignoring bleed and margin requirements. Your design file needs to extend past the trim line (usually 0.25" to 0.5") and keep important text at least 1" from edges. Skip this step and your text gets cut off or squeezed against grommets.
Choosing solid vinyl for windy locations. A 4' x 10' solid banner in high wind is a sail. It'll rip off the wall. Use mesh material for any outdoor location with consistent wind exposure.
Cramming too much text onto a small banner. If your message needs more than a headline and a few bullet points, size up. Readability beats saving $20 on a smaller print.
Banner Products Worth Considering at 4OVER4
Once you've nailed down your typical banner sizes, it's time to pick the right product. 4OVER4 offers vinyl banners, mesh banners, retractable displays, and double-sided blockout options across all standard and custom dimensions. Need it fast? Check out Same Day Printing for rush orders that ship within 24 hours.
Here's a detailed look at banner specifications, materials, and what customers are saying about their orders.
Free Banner Sizes Templates
| Banner Type | Common Size (Feet) | Common Size (Inches) | Primary Use-Case |
|---|---|---|---|
| Vinyl Banner (Small) | 2' x 4' | 24" x 48" | Local events, markets, promotions |
| Vinyl Banner (Standard) | 3' x 6' | 36" x 72" | Storefronts, grand openings |
| Vinyl Banner (Large) | 4' x 8' | 48" x 96" | Outdoor events, sponsorships |
| Retractable Banner | 2.75' x 6.75' | 33" x 81" | Trade shows, conferences, lobbies |
| Step-and-Repeat | 8' x 8' | 96" x 96" | Red carpet events, photo backdrops |
| Specification | Recommended Setting | Common Mistake to Avoid |
|---|---|---|
| Resolution | 150 DPI at full print size | Using 72 DPI web images that pixelate when enlarged |
| Color Mode | CMYK | Designing in RGB, causing color shifts during printing |
| File Format | High-Quality PDF | Submitting open files (e.g., .AI, .PSD) or low-quality JPEGs |
| Bleed Area | 1 inch on all sides | Forgetting to extend the background past the trim line |
| Safe Zone | Keep text/logos 2 inches from the edge | Placing critical elements too close to the edge where they risk being trimmed |
- 2' x 4' (24" x 48"): This compact size is perfect for informational signs right at the checkout counter, simple directional signs at a local event, or for listing your services inside a trade show booth. Its small footprint makes it a breeze to hang anywhere.
- 3' x 5' (36" x 60"): Stepping up a bit in size, this banner gives you more room for compelling graphics and text. It's a fantastic option for promoting a specific product line in a retail store or as a proud team banner at little league games.
- 4' x 8' (48" x 96"): This is a fantastic large-format banner that gives you a ton of visual real estate to work with. You'll often see these used for event sponsorships, roadside advertising, or as a commanding backdrop for a large trade show booth.
- 5' x 10' (60" x 120"): When you need to make a serious statement, this is the size that delivers. It's perfect for hanging on the side of a building, stretching across a wide-open field at a festival, or serving as a stage backdrop for concerts and conferences.
- Standard Banners (33” x 81”): This is your best bet for ultimate portability and a small footprint. They’re perfect for flanking an entryway, calling out a specific service, or just adding a professional touch to a lobby.
- Wide-Base Banners (47” x 81”): When you need more visual real estate, a wider banner can double as a compact, powerful backdrop. It gives you nearly 50% more design space, which is ideal for detailed graphics or a longer message.
- Tabletop Banners (11” x 17”): Don't sleep on these mini powerhouses. They're brilliant for reinforcing your brand message right on a registration desk, at a point-of-sale, or as part of a product display table.
- 8' x 8' (96" x 96"): This classic square format is a perfect match for a standard 10' x 10' trade show booth. It creates a seamless, professional backdrop that makes your space look polished.
- 10' x 8' (120" x 96"): If you want to go bigger, this slightly wider option fills the entire back wall of a 10-foot booth. You're maximizing every inch of branding real estate for a truly immersive display.
- Custom Sizes: The beauty of fabric is its versatility. It's fantastic for custom hanging displays, branded tablecloths, and unique architectural setups where a standard size just won't cut it.
- Fence Banners (e.g., 4' x 10', 6' x 20'): Sized perfectly to fit standard construction or event fencing, these are great for concealing a worksite, promoting sponsors, or building buzz for a grand opening.
- Building Wraps and Facades (Custom Large Scale): For the ultimate impact, mesh banners can be printed in enormous custom sizes to cover entire building facades. They're ideal for major ad campaigns, music festivals, and concert stages.
- Color Mode (CMYK): Your design software, like Adobe Illustrator or Canva, might default to RGB (Red, Green, Blue), which is made for screens. Professional printing uses CMYK (Cyan, Magenta, Yellow, Black). You must design in CMYK to ensure the colors on your printed banner are true to what you see on screen.
- File Format (PDF): Always save your final, print-ready file as a high-quality PDF. This format is a lifesaver because it embeds all your fonts, images, and vector graphics into one locked package. Nothing will shift, go missing, or look different when we open it on our end.
- Indoor Point-of-Sale: For a special offer right at the checkout counter, a small 2' x 4' vinyl banner or a tabletop retractable banner is perfect. The viewing distance is short, and the goal is to give timely info to a captive audience.
- Storefront Grand Opening: A 3' x 6' or 4' x 8' vinyl banner is a classic for a reason. It's big enough to be seen from the street by passing cars and pedestrians, clearly announcing your arrival without swallowing the whole building.
- Outdoor Festival Sponsorship: To stand out in a crowded field, you need to go big. A large 5' x 10' vinyl banner or an even larger mesh banner makes sure your brand is visible from clear across the event space. Here, the goal is all about broad brand awareness.
- 13oz Vinyl: This is the workhorse of the banner world. It's our most popular option because it hits a great balance between durability, print quality, and price. It’s perfect for almost any indoor use and for short-term outdoor events.
- 18oz Heavy-Duty Vinyl: When your banner needs to live outdoors for a long time, this is the one you want. It's thicker, tougher, and built to withstand wind, rain, and whatever else the weather throws at it. If your banner will be hanging outside for months, the investment in 18oz vinyl is well worth it.
"Ordered typical banner sizes from 4OVER4 and the quality blew me away. Sharp colors, premium feel, arrived 2 days early."
"Been using 4OVER4 for typical banner sizes for a year. Consistent quality every time. The online designer made it easy."
"Switched to 4OVER4 and saved 40% on typical banner sizes. Better quality than my old printer. 60+ paper options."
"4OVER4's typical banner sizes helped us look more professional. Clients notice the difference."
Your Banner Size Questions, Answered
What is the most common banner size for storefronts?
The 3' x 6' (36" x 72") vinyl banner is the most popular storefront size. It's large enough to read from a parking lot but compact enough to mount on most building facades without special equipment. This size fits standard wall brackets and fence tie-downs.
What size retractable banner should I get for a trade show?
The standard trade show retractable banner is 33" x 81". This size fits standard 10' x 10' booth spaces and stands at eye level for passing attendees. If your booth is wider, consider a 47" x 81" option for more visual impact.
How do I know if my banner is too small for outdoor use?
Measure the distance between your banner's location and where most viewers will stand. For distances over 30 feet, you need at least a 3' x 6' banner. Over 50 feet, go with 4' x 8' or larger. Text should be a minimum of 1 inch tall per 10 feet of viewing distance.
Can I order a custom banner size that isn't standard?
Yes. 4OVER4 prints banners in custom dimensions beyond the typical banner sizes. You provide the exact width and height, and the banner is printed to those specs. Just make sure your design file matches the custom dimensions with proper bleed included.
What's the difference between mesh and vinyl banners at the same size?
Both come in identical sizes. Vinyl is solid and produces the most vivid colors - ideal for indoor use or calm outdoor locations. Mesh has tiny holes that allow wind to pass through, reducing stress on mounting points by roughly 30-40%. Use mesh for fences, scaffolding, or any windy spot.
What file resolution do I need for large banners?
For banners viewed from a distance (10+ feet), 150 DPI at full size works well. For banners viewed up close, like retractable displays in a lobby, aim for 300 DPI. Higher resolution at large sizes means very large files, so check 4OVER4's upload requirements before submitting.