Table of Contents
- Home
- content hub
- How to Make Lenticular Prints: Easy DIY Guide
How to Make Lenticular Prints: Easy DIY Guide
Jul 12, 202512517 views
Jul 12, 202512517 views
So, you’re ready to dive into the world of lenticular printing? It’s a fascinating space where static images come to life, creating illusions of depth, motion, and transformation right before your eyes. This guide is your complete roadmap, designed to walk you through the entire process from a simple idea to a finished print that pops.
We’re going to cover everything you need to know to turn your pictures into dynamic art that seems to move, change, or jump out in 3D as someone shifts their view.
This isn’t some brand-new gimmick; the core concepts have been around for over a century. The technology's roots trace back to the late 19th and early 20th centuries. One of the first related patents was for a 'Stereograph' filed way back in 1898, which used a corrugated transparent surface over an interlaced picture to create a primitive 3D effect. You can actually find more on these early stereoscopic technologies on Wikipedia.
Breaking Down the Lenticular Workflow
At its heart, making a lenticular print comes down to mastering three distinct stages. Think of it as a production line where digital artistry meets hands-on craftsmanship. Each step builds on the last, leading to that "wow" moment when you see the final product.
Here’s a look at how it all comes together:
- Creative Design: This is where the magic begins. You start by deciding on the effect you want—maybe a simple two-image flip, a multi-frame animation, or a deep 3D illusion. Then, you'll prepare your source images to make that vision a reality.
- Technical Interlacing: Next up is the digital heavy lifting. You'll use specialized software to slice your source images into super-thin strips and weave them together into a single, coded file. To the naked eye, this interlaced image will just look like a jumbled mess.
- Printing and Finishing: Finally, you print the interlaced file and carefully bond it to the back of a lenticular lens sheet. When everything is aligned just right, the tiny lenses on the sheet direct the viewer's eyes to see only certain image strips at a time, creating the intended effect.
The real magic happens when your precisely printed and interlaced image aligns perfectly with the tiny lenses on the plastic sheet. This alignment is what unlocks the illusion of motion or depth.
Before we dive deeper into each step, here’s a quick overview of the entire process.
Lenticular Printing at a Glance
This table breaks down the key stages, what you're trying to accomplish in each, and the tools you'll need to get it done. It's a great reference to keep handy as you start your first project.
| Stage | Primary Goal | Key Tools |
|---|---|---|
| Design | Create the source images for your desired effect (flip, 3D, etc.). | Adobe Photoshop, Illustrator |
| Interlacing | Slice and combine the source images into a single printable file. | Lenticular Software (e.g., HumanEyes, Power-Trans) |
| Printing | Print the interlaced image and bond it to a lenticular sheet. | High-Resolution Printer, Lenticular Lenses, Laminator |
This combination of art and science is what makes lenticular printing so unique and rewarding. While there's a technical side to it, the creative possibilities are nearly endless, from animated business cards that grab attention to large-format art pieces that stop people in their tracks. Many creators use it to add that surprising "x-factor" to their work, joining artists who explore specialty printing collections to make their projects unforgettable.
Now, let's get you the foundational knowledge and confidence to bring your first lenticular project to life.
Gathering Your Essential Tools and Materials
Before you can bring your dynamic images to life, you need to get your toolkit in order. Just like a chef preps their ingredients, getting your materials sorted out is the first real step toward a great final print. If you invest wisely right from the start, you'll save yourself a lot of frustration and wasted supplies down the line.
The most critical piece of the puzzle is the lenticular lens sheet itself. These aren't just simple pieces of plastic; they are precision-engineered with tiny, parallel ridges called lenticules. The density of these lenses, measured in LPI (Lenses Per Inch), is the single specification that will most heavily influence your print's final look.
Choosing the Right Lenticular Lenses
The LPI you pick comes down to one thing: your project's intended viewing distance.
A higher LPI, like 75 or 100, packs more lenses into each inch. This makes it perfect for things people will hold up close, like business cards or postcards. On the other hand, a lower LPI, such as 20 or 40, is the way to go for larger prints like posters that people will see from several feet away.
Your choice of LPI is a foundational decision that impacts everything from software settings to final print clarity. Mismatching your digital interlacing settings with the physical lens LPI is one of the most common reasons for "ghosting," where both images in a flip appear faintly at the same time.
Printers, Inks, and Software
Next up, you need a way to get your interlaced image from the screen onto paper. And no, not just any old printer will do the job. You'll want a high-resolution inkjet printer, ideally one capable of at least 720 dpi or more, to produce the incredibly fine detail required. The quality of your ink is also a big deal for creating the vibrant, saturated colors that make lenticulars pop.
Your software lineup will fall into two main categories:
- Image Preparation: A program like Adobe Photoshop is pretty much essential. This is where you'll create and layer your source images, separating foreground and background elements for 3D effects or prepping your images for a clean flip.
- Interlacing Software: This is the specialized tool that does the real technical magic. Programs like SuperFlip! or PowerInterlacer take your source images and your lens's LPI value to create that final, jumbled-looking image that's ready for printing.
Finally, don't forget the finishing supplies. To bond your print to the lens, you'll need an optically clear adhesive. You can apply this by hand or, for a much cleaner, bubble-free finish, use a cold-press laminator.
For those just getting started or aiming for truly professional-grade results, it can be a great idea to explore high-quality digital printing services. This gives you a reliable benchmark for what's achievable and can save a lot of headaches.
Designing Images for Maximum Lenticular Impact
A spectacular lenticular print doesn’t just happen. It’s born from thoughtful, intentional design. The choices you make long before you even touch interlacing software will determine whether your final piece has that "wow" factor or just falls flat. This is where your creative strategy begins—prepping your source images to shine in this unique medium.
The two most popular effects, the flip and 3D depth, each demand a different creative approach. For a flip effect, your main goal is creating a seamless, natural transition between two or more frames. The secret is to pick images that share a similar composition and color palette. Trust me, a jarring jump from a dark, moody scene to a bright, sunny one just doesn't work. Think more along the lines of a character winking or a logo smoothly changing color. Subtle shifts are your best friend here.
Crafting Images for Flips and 3D
When you’re aiming for that convincing illusion of 3D depth, your entire workflow will revolve around layers. This is where a powerhouse tool like Adobe Photoshop becomes absolutely essential. The core principle is simple: you need to separate your subject from its background to create distinct planes of depth. Picture it like building a little diorama or a stage set—you need a backdrop, a middle ground, and a foreground.
Let's say you're designing a 3D business card. A good layer structure would look something like this:
- The background texture or a solid color goes on the bottom-most layer.
- Your name and contact info would sit comfortably on a middle layer.
- Your company logo, the star of the show, should be on the very top layer.
By isolating these elements, you give the interlacing software exactly what it needs to create the parallax effect that tricks our eyes into perceiving depth.
The more separation you create between your foreground and background elements, the more dramatic the 3D effect will be. But a word of caution from experience: pushing the depth too far can sometimes introduce visual artifacts or "ghosting." A little moderation often leads to the cleanest, most impressive results.
Avoiding Common Design Pitfalls
When you're first learning how to make lenticular prints, it's incredibly easy to forget how the interlacing process impacts the finer details of a design. Some elements just don't translate well from a crisp digital screen to the ridged surface of a lenticular print.
Here are a few critical things I've learned to avoid:
- Thin Fonts: Those elegant, wispy serif fonts? They often become a mess. Parts of the letters can disappear between the tiny lenses (the lenticules), rendering your text illegible. Always opt for bolder, sans-serif fonts.
- Fine Details: Intricate patterns, delicate textures, and super-thin lines will almost certainly get lost or look blurry. You need to think in bigger, more defined shapes and elements.
- High-Contrast Edges: While good contrast is usually a plus in design, be careful about placing a very light object directly against a very dark background, especially at your main focal point. This can sometimes amplify that ghosting effect I mentioned earlier.
Thinking about these limitations before you start designing will save you a world of frustration, not to mention time and money on test prints. While lenticular is fantastic for motion, if you're looking for a static but equally eye-catching effect for other projects, you might want to explore options like holographic printing.
The Interlacing Process: Unlocking the 3D Effect
This is where the real magic happens. We’re at the technical heart of making a lenticular print: interlacing. Think of it as digitally weaving your images together. This step takes your source images, slices them into incredibly thin strips, and then combines them into one single, coded file.
To the naked eye, this interlaced image will just look like a blurry, jumbled mess. But that’s the secret. Once you print it and lay the right lenticular lens on top, that chaos snaps into focus, revealing a dynamic, animated picture.
Let's walk through this with a real-world example, like making a two-image flip postcard. You’ve got your two final images ready. The next step is to fire up your specialized lenticular software. I've used programs like SuperFlip! and PowerInterlacer for this—they're built specifically for this job.
Configuring Your Interlacing Software
The moment you open a new project, the software will ask for a few critical details. These aren't just suggestions; they're precise instructions that tell the program how to slice your images to perfectly match your physical lens sheet. Getting these settings right is absolutely non-negotiable if you want a print that works.
Here’s what you’ll need to input:
- Source Files: This is straightforward. You’ll just load your two images (let's call them Image A and Image B for our postcard).
- Lenses Per Inch (LPI): You have to enter the exact LPI of the lenticular sheets you plan to use. If your lens is 75 LPI, you enter 75. No guessing.
- Output Resolution: This needs to match what your printer can handle best. A good starting point is often 720 dpi, but always check your printer’s specs for its optimal resolution.
- Orientation: For a flip effect, you'll choose horizontal alignment. For 3D and other animations, you'd select vertical. Since we're making a flip postcard, we'll go with horizontal.
Take a breath and double-check every single one of those settings. I can't stress this enough. A tiny typo, like entering 72 LPI instead of 75, is all it takes to completely ruin the print. Precision is everything at this stage.
The All-Important Pitch Test
Now for an insider tip that really separates the beginners from the pros: always run a pitch test.
Even if a lens sheet is advertised as "75 LPI," the actual effective LPI can be slightly different. This is due to tiny manufacturing variations or even the unique quirks of your printer and paper combination. The pitch test is a small calibration print that helps you discover this true number.
Your software will generate a test file with a series of black bars printed at slightly different pitches—for example, 74.9 LPI, 75.0 LPI, and 75.1 LPI. You print this strip, place your lenticular lens over it, and look for the one bar that appears perfectly solid and black, with no weird banding or color bleed. That’s your "true" LPI.
Using this calibrated number is your single best defense against ghosting and will make your final effect as crisp and clean as possible.
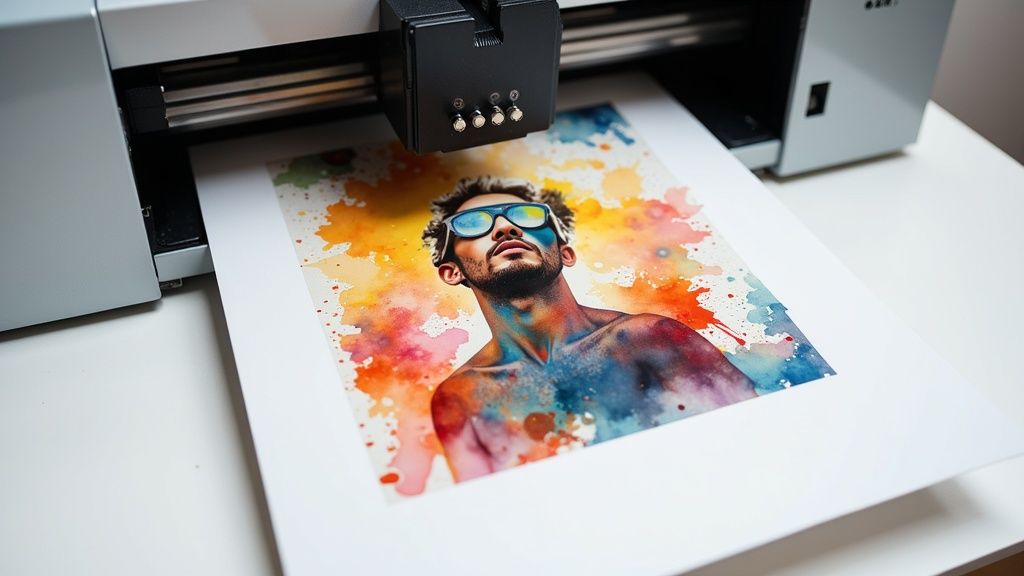
This visual guide shows the final hands-on part of the process—applying the print to the lens, which requires just as much care as the digital setup.
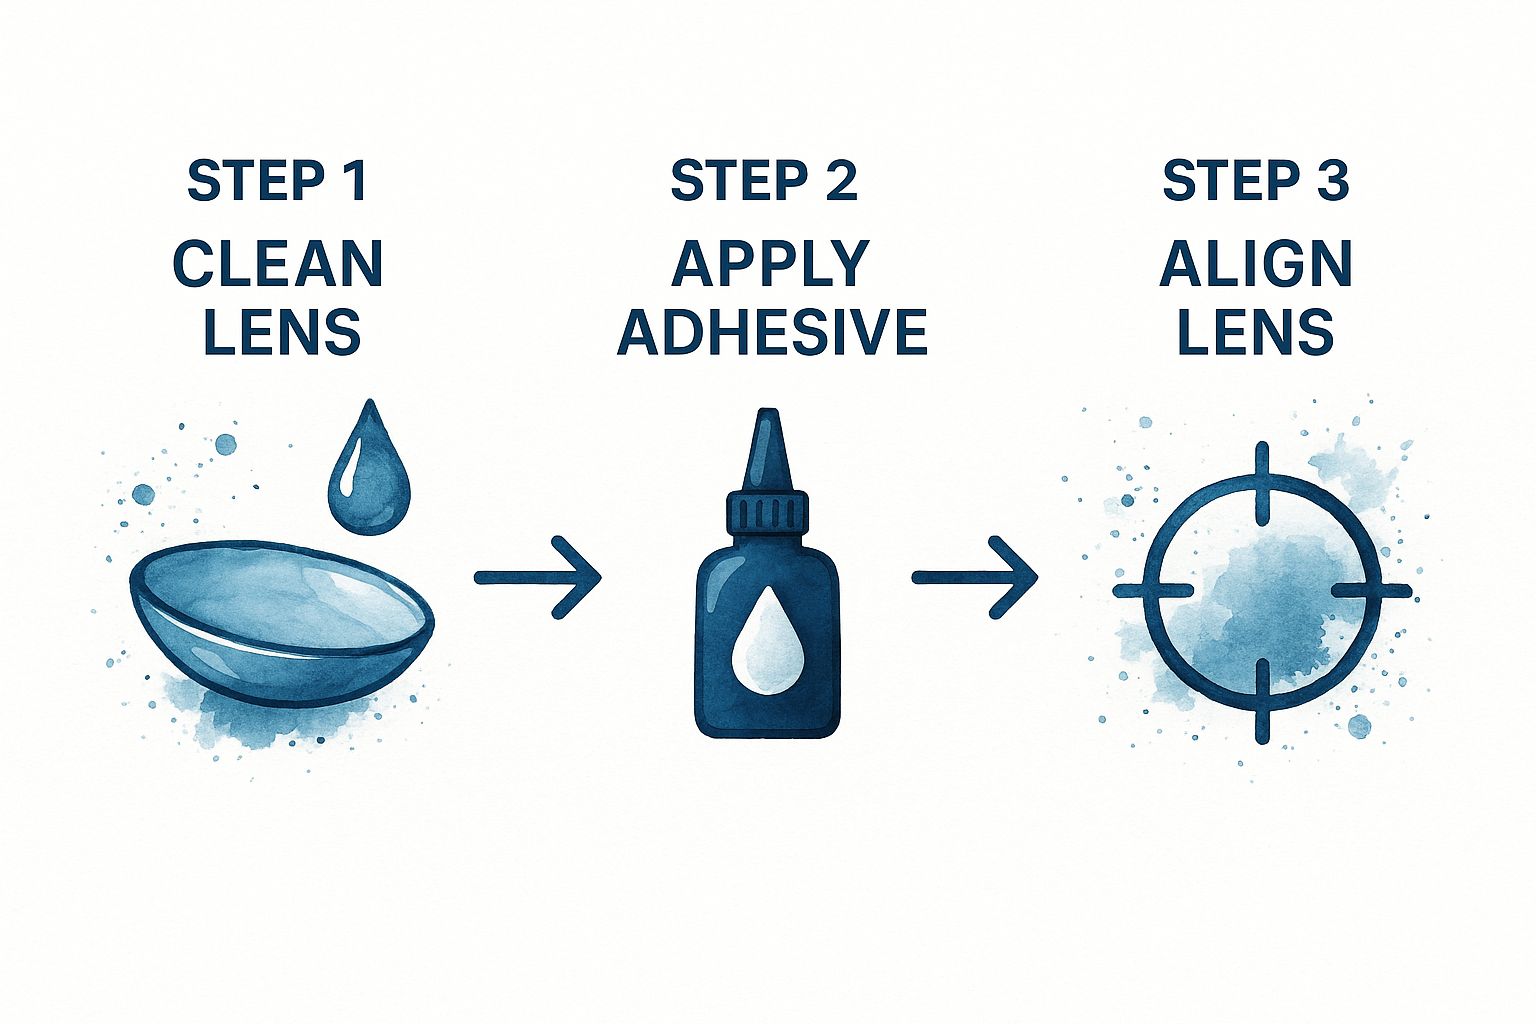 As you can see, a clean lens, a smooth and even application of adhesive, and perfect alignment are the physical keys to success. Once you've mastered the digital interlacing, turning that printed sheet into a finished piece all comes down to this careful, hands-on work.
Printing and Finishing Your Lenticular Masterpiece
This is the moment of truth. You’ve painstakingly designed your images and wrestled with the technical details of interlacing. Now, it's time to bring that digital file to life and create a physical object you can actually hold. This final stage is all about precision—it’s what separates a decent lenticular print from a truly stunning one.
It all starts at your printer. The settings you choose here are every bit as important as the LPI you decided on earlier. You absolutely have to print at a high resolution to capture the incredibly fine detail of those interlaced strips. I always aim for 720 dpi as a bare minimum, but if your printer can go higher, do it.
Even more importantly, you must disable any and all automatic scaling options. Hunt down settings like "Fit to Page," "Scale to Fit," or "Fill Entire Paper" and make sure they are switched off. Your interlaced image has to be printed at its exact, native size. No exceptions. This is the only way it will align perfectly with the lens sheet.
Laminating for a Flawless Bond
Once your interlaced image is printed, the next hurdle is adhering it to the back of the lenticular lens. This bond has to be perfectly clear, super strong, and completely free of air bubbles, which are the sworn enemy of a good lenticular effect. This is where an optically clear adhesive is non-negotiable.
You have a couple of ways to tackle this:
- Manual Application: You can apply the adhesive sheet by hand using a squeegee. This method requires a very steady hand and a good deal of patience. You’ll want to start at one edge and slowly, carefully smooth the print down onto the adhesive, pushing out any air bubbles as you go.
- Cold-Laminating Machine: If you’re looking for consistent, professional-grade results, a cold-press laminator is your best friend. It applies perfectly even pressure across the entire surface, giving you a bubble-free bond that’s almost impossible to get right by hand.
Pro Tip: Before you fully commit to laminating, lightly tack one edge of your print to the lens. Hold it up to a light source and gently move it side-to-side. This is your last chance to check the alignment with the lens striations. If the flip or 3D effect looks sharp, you’re cleared for takeoff.
The Final Cut: Precision Trimming
With your print securely bonded to the lens, the only thing left is the final trim. Don't rush this part. A clean, straight edge is the finishing touch that gives your project a polished, professional look. Grab a sharp craft knife, a heavy metal ruler, and a cutting mat.
Remember the old saying: measure twice, cut once. A sloppy cut can fray the edges or even cause the print and lens to separate a bit. Take your time to get it perfect. The result will be a dynamic piece of art that seems to move and shift right before your eyes.
This level of attention to detail is critical for any high-quality print job, from fine art prints to custom marketing materials. For instance, the precision needed for creating unique plastic cards relies on similar principles of quality control and flawless finishing. You can learn more about producing high-quality plastic card printing that makes an impact.
Ultimately, mastering lenticular printing comes down to this final, hands-on stage—where digital precision meets tactile skill.
Common Questions When Making Lenticular Prints
As you dive into the world of lenticular printing, a few questions are bound to pop up. It’s a process that feels like a blend of art and science, and there are a handful of common hurdles that tend to trip up beginners. Let's clear up some of the most frequent points of confusion.
Tackling these challenges from the get-go will help you fine-tune your technique, sidestep frustrating problems, and achieve that polished, professional result you’re after.
Why Is LPI So Important?
One of the first terms you’ll bump into is LPI, or Lenses Per Inch. This isn't just a random piece of tech jargon; it’s arguably the most critical detail for any lenticular project. It tells you exactly how many tiny, parallel lenses are packed into every single inch of the plastic sheet you're printing on.
This number has a direct impact on both the resolution of your final print and its ideal viewing distance. Here's how it breaks down in practice:
- High LPI (75-100): These lenses are incredibly fine and packed tightly together. This makes them perfect for handheld items like business cards or invitations that people will see up close.
- Low LPI (20-40): These lenses are bigger and spaced further apart. This is what you want for large posters or displays meant to be viewed from several feet away.
Here’s a critical takeaway: your design software's LPI setting must perfectly match the LPI of your physical lens sheet. Even a tiny mismatch is the number one cause of "ghosting"—that blurry, annoying effect where both images in a flip are faintly visible at the same time.
Can I Use Any Inkjet Printer?
While it’s tempting to just use whatever printer you have sitting on your desk, not all of them are cut out for this kind of work. The single most important feature you need is the ability to print at a very high resolution. To accurately reproduce the fine, interlaced lines your software creates, you need a printer capable of at least 1200 dpi.
Beyond pure resolution, your printer must give you the control to turn off all automatic scaling features. Things like "fit to page" or "scale to fit" will instantly ruin the effect by resizing your image and throwing off the alignment with the lenses. The interlaced file has to be printed at its exact, native size, period.
Printers with a straight-through paper path are also a massive bonus, as they can handle the thicker, more rigid lenticular sheets without jamming or bending.
Is a Pitch Test Really Necessary?
In a word: yes. A pitch test is absolutely essential if you're serious about getting professional-quality results. Think of it as a quick but vital calibration step that will save you from wasting a ton of time and expensive materials.
Even though a lens sheet might be advertised as 60 LPI, the true, effective LPI can shift slightly depending on your specific printer, the ink you're using, and even the paper.
A pitch test is how you find this precise, real-world value. It involves printing a series of lines at slightly different LPIs (for example, 59.9, 60.0, 60.1). You then lay your lens sheet over this test print to see which line looks the sharpest and most solid.
Honestly, skipping this step is the most common mistake I see people make, and it's the leading cause of failed prints. This kind of attention to detail is what separates the pros from the amateurs, and it applies even to smaller formats where precision is everything. You can see similar principles of precision at play in high-quality trading cards printing.
Ready to create eye-catching prints that move and change? The team at 4OVER4 has the expertise and technology to bring your most creative ideas to life with stunning clarity and quality. Explore our printing solutions today at https://4over4.com.
More from

9
You might think sending an email or a text is all that matters these days, but don't underestimate the power of physical mail. It carries
![]() Emma Davis
Emma Davis
Mar 21, 2026

26
Picture this: your business has a silent, tireless salesperson working for you 24/7 on the busiest street in town. That’s t
![]() Emma Davis
Emma Davis
Mar 20, 2026

42
Printing on ribbon is the art of transferring your custom design, logo, or text onto a roll of fabric. It’s what transforms a simple decorat
![]() Emma Davis
Emma Davis
Mar 19, 2026

147
If you've ever wondered about the standard gift card dimensions, there’s one number you need to know: CR80
![]() Emma Davis
Emma Davis
Mar 17, 2026

60
When you’re launching a product, your bottle label is often the first thing a customer sees. Think of it as your silent salesperson
![]() Emma Davis
Emma Davis
Mar 16, 2026

184
When you're brainstorming ideas for landscaping business cards, it helps to think beyond just contact information. Your c
![]() Emma Davis
Emma Davis
Mar 15, 2026

261
When you think of a yard sign, the classic 18"x24" is probably what comes to mind. It’s the industry workhorse fo
![]() Emma Davis
Emma Davis
Mar 14, 2026

205
When you’re ready to invest in an A-frame sign, the first question you'll ask is, "What size do I need?" It usually comes down
![]() Emma Davis
Emma Davis
Mar 13, 2026