Sticker Sizes Chart 2026: Every Size Matched to Its Best Use
A sticker sizes chart guide is the fastest way to match your design to the right dimensions. Small stickers (1-2 inches) work for product seals and subtle branding. Medium stickers (3-4 inches) fit laptops, water bottles, and packaging. Large stickers (5+ inches) handle bumper stickers, windows, and shipping boxes. 4OVER4.COM prints custom stickers in all these sizes across 1,000+ products in the catalog.
"I wasted so much time guessing sticker sizes before I found a proper reference chart. Once I matched my logo to a 2-inch round sticker for our coffee bags, everything clicked. The print came out crisp, and the size was exactly right."
- Monica R., Small Batch Coffee Roaster
Whether you're sealing envelopes, branding product packaging, or handing out promotional decals at events, the wrong sticker size kills the whole effect. Too small and nobody notices. Too big and it looks awkward. This guide walks you through every common sticker dimension by shape, material, and use case so you can order with confidence. For more expert printing tips, 4OVER4.COM has you covered.
Your Quick-Reference Sticker Sizes Chart
Choosing the right sticker size doesn't need to be complicated. A well-organized sticker sizes chart guide breaks dimensions into three simple buckets - small, medium, and large. Each bucket maps directly to real-world applications. No guesswork required.
Let's get specific about what falls into each category:
- Small Sizes (1" to 2"): Perfect for subtle branding moments. Seal an envelope, label a lip balm tube, or stick a discreet logo on a phone case. These tiny stickers pack a surprising punch without overwhelming the surface they're on.
- Medium Sizes (3" to 4"): The sweet spot for versatility and visibility. A 3" x 3" sticker is a classic choice for laptop decals, water bottle branding, and packaging accents. Big enough for detailed artwork and readable text.
- Large Sizes (5" and up): When you need to make a statement. Car bumpers, storefront windows, large shipping boxes. These grab attention from a distance and usually need weatherproof materials to hold up.
This visual breakdown gives you a quick idea of how size categories translate to actual use. From personalizing your gear to branding a delivery fleet, the sticker's job dictates its size. Browse our full range of custom stickers and labels to see what's possible at every dimension.
Are you going for a subtle product accent or a high-impact promo piece? That single question should drive your size decision. Think about where the sticker lands, how far away people will be when they see it, and how much design detail you need to fit.
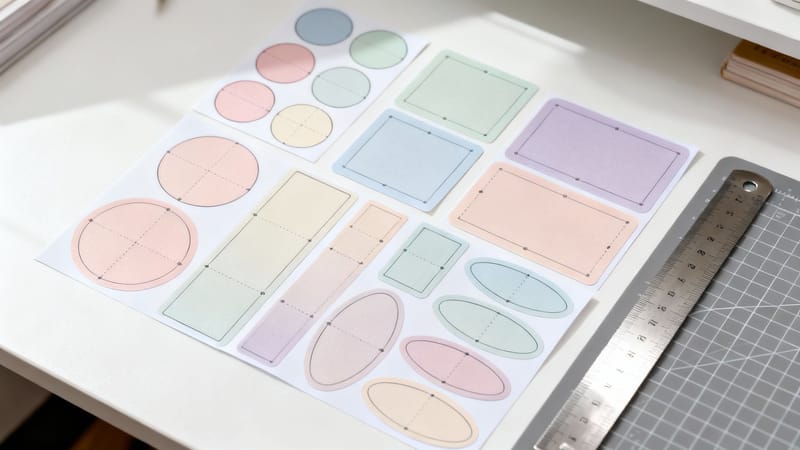
Standard Sticker Dimensions Organized by Shape
Shape changes everything about how a sticker performs. A round sticker reads differently than a rectangle. An oval feels different than a die-cut. Knowing the standard dimensions for each shape helps you visualize the final product before you spend a dime on printing.
Here's a detailed breakdown of the most popular sticker shapes and their standard sizes. You'll find dimensions in both inches and millimeters for total clarity.
Round Sticker Sizes
Round stickers are a classic. Their symmetrical shape works beautifully for logos, seals, and minimalist designs. They sit cleanly on any surface without sharp corners catching or peeling.
The most common round sticker dimensions include:
- 1" x 1" (25.4mm x 25.4mm): Tiny branding touches. Envelope seals, cosmetic jar labels, thank-you card accents.
- 2" x 2" (50.8mm x 50.8mm): The most popular round size. Clear enough for a logo on product packaging, coffee cups, or craft beer bottles.
- 3" x 3" (76.2mm x 76.2mm): Great for giveaway stickers at events. Big enough to read from arm's length.
- 4" x 4" (101.6mm x 101.6mm): Bumper sticker territory. Works on car windows, large water bottles, and retail displays.
If you're looking for something that really pops off the surface, check out 3D Lenticular Stickers. They add motion and depth that flat stickers simply can't match.
Square Sticker Sizes
Square stickers give you a clean, modern look. They're especially popular with tech brands, food packaging, and social media QR code stickers. The equal sides create a balanced frame for centered designs.
Standard square sticker dimensions:
- 1.5" x 1.5" (38.1mm x 38.1mm): Small product labels, price tags, or QR code stickers for menus.
- 2" x 2" (50.8mm x 50.8mm): Versatile mid-range option. Social media handle stickers, small packaging seals.
- 3" x 3" (76.2mm x 76.2mm): Laptop stickers, notebook covers, retail bag closures.
- 4" x 4" (101.6mm x 101.6mm): Window clings, product box branding, event handouts.
Rectangular Sticker Sizes
Rectangles are the workhorses of the sticker world. They handle text-heavy designs, address labels, product descriptions, and bumper stickers better than any other shape. The extra horizontal or vertical space gives you room to breathe.
Common rectangular sticker dimensions:
- 2" x 1" (50.8mm x 25.4mm): Return address labels, small product identifiers.
- 3" x 2" (76.2mm x 50.8mm): Name tags, small promotional stickers, jar labels.
- 4" x 3" (101.6mm x 76.2mm): Shipping labels, product information stickers.
- 5" x 3" (127mm x 76.2mm): Bumper stickers, toolbox decals, larger product labels.
- 8" x 3" (203.2mm x 76.2mm): Full bumper stickers, banner-style decals.
Need a shape that's completely unique to your brand? Custom Die Cut Stickers let you cut around any outline - your logo, a mascot, a product silhouette. No standard shape required.
Oval Sticker Sizes
Oval stickers bring a softer, more elegant feel than rectangles or squares. They're a go-to for artisan products, wine labels, candle branding, and vintage-style designs. The curved edges give them a premium, handcrafted look.
Standard oval sticker dimensions:
- 2" x 1.5" (50.8mm x 38.1mm): Small product labels for handmade goods, spice jars.
- 3" x 2" (76.2mm x 50.8mm): Candle labels, wine bottle stickers, bakery packaging.
- 4" x 3" (101.6mm x 76.2mm): Larger product labels, gift basket branding.
How to Match Sticker Sizes to Real-World Use Cases
Knowing the dimensions is one thing. Knowing which size to pick for your specific project is where the real value of a sticker sizes chart guide kicks in. Let's walk through five common scenarios and the sizes that work best for each.
Product Packaging and Labels
If you're a small business owner selling candles, skincare, or food products, sticker size directly impacts how professional your packaging looks. A candle jar with a 3" x 2" oval label looks intentional and polished. That same jar with a 1" round sticker looks like an afterthought.
For product packaging, measure the surface area where the sticker will go. Leave at least 0.25 inches of margin on all sides so the sticker doesn't wrap around edges or overlap seams. A 2" x 3" rectangle handles most small-to-medium containers. Larger bottles or boxes might need a 4" x 6" label.
Promotional Giveaways and Events
Handing out stickers at trade shows, festivals, or in-store? The 3" x 3" size is the industry standard for giveaway stickers. It's big enough to show off your design, small enough to fit in a pocket, and the right size for laptops, water bottles, and phone cases.
For event branding, consider going bigger. A 5" x 5" sticker on a gift bag or a 4" x 6" rectangle tucked into a welcome kit makes a stronger impression. For creative promotion ideas, check out these Logo Sticker Design Ideas that show how brands use stickers to build recognition.
Laptop and Personal Decals
Laptop stickers are a cultural phenomenon. The sweet spot is 2" to 4" in any shape. Anything smaller gets lost in a sea of other stickers. Anything bigger dominates the lid and limits how many stickers fit.
Round and die-cut shapes tend to perform best for laptop decals because they stand out against the rectangular surface. Square stickers can tile nicely if you're going for a pattern effect.
Vehicle and Window Stickers
Bumper stickers have a standard size range of 8" x 3" to 11" x 3". Window decals can go much larger, sometimes 12" x 12" or bigger for rear windows. These stickers need to be readable from several feet away, so font size matters as much as sticker size.
For vehicle stickers, always use vinyl material with UV-resistant lamination. Paper stickers will fade and peel within weeks of sun exposure.
Envelope Seals and Mailing
Envelope seals are one of the most underrated branding opportunities. A 1" to 1.5" round sticker on the back flap of an envelope adds a professional touch that costs pennies per piece. Wedding invitations, business correspondence, holiday cards - they all benefit from a well-placed seal.
For mailing labels, the standard USPS-friendly size is 4" x 2.5" or 4" x 3.33". These fit standard label sheets and work with most printer setups. If you're designing greeting cards or invitations, you might also find inspiration in these Diy Greeting Card Design Ideas.
Material and Finish Considerations by Sticker Size
Size isn't the only decision. The material and finish you choose affect durability, appearance, and where the sticker can be used. Here's how material choices interact with different sticker sizes.
Vinyl stickers are the toughest option. Waterproof, UV-resistant, and tear-proof. They're the default choice for outdoor stickers, vehicle decals, and anything that needs to survive weather. Available in all sizes from 1" rounds to full vehicle wraps.
Paper stickers cost less and work great for indoor applications. Product labels, packaging seals, planner stickers, and craft projects. They're not waterproof, so keep them away from moisture. Paper stickers print beautifully with matte or glossy finishes.
Clear stickers create a "no-label" look where the design appears printed directly on the surface. They're popular for glass bottles, windows, and premium packaging. Sizes from 1" to 6" are most common for clear material.
Finish options also matter. Glossy finishes make colors pop and work well for photo-based designs. Matte finishes reduce glare and give a sophisticated, modern feel. Soft-touch lamination adds a velvety texture that makes people want to touch the sticker - a smart move for premium branding.
"We switched from glossy to matte finish on our 3-inch round product stickers and the feedback was immediate. Customers said the packaging looked more premium. Same size, same design - just a different finish made all the difference."
- David K., Artisan Soap Company Owner
Design Tips for Different Sticker Sizes
Your design needs to work within the dimensions you choose. A design that looks amazing at 5" x 5" might be unreadable at 1" x 1". Here are practical design rules tied directly to sticker size.
For small stickers (1-2 inches), keep it simple. One icon, one word, or a clean logo mark. No fine text. No detailed details. At this size, simplicity equals clarity. Your design should be recognizable from 12 inches away.
For medium stickers (3-4 inches), you have room for a logo plus a tagline or website URL. You can include more detail in the artwork, but keep font sizes at 8pt minimum for readability. This is where most branded stickers live.
For large stickers (5+ inches), you can go wild with detail. Full illustrations, paragraphs of text, complex graphics - all fair game. Just make sure your file resolution is at least 300 DPI at the final print size. A design that looks sharp on screen at 72 DPI will look blurry and pixelated when printed at 8 inches wide.
Always design with bleed. Add 0.125 inches of bleed around all edges so your design extends past the cut line. This prevents white borders from appearing if the cut is slightly off. Every professional sticker printer, including 4OVER4.COM, requires bleed in submitted files.
Need a head start on your design? Browse our Design Templates for ready-to-customize sticker layouts in all standard sizes. If you're building a broader brand identity, these Classy Business Card Design Inspiration examples show how consistent design across print materials strengthens recognition.
Ordering Custom Stickers at 4OVER4.COM
4OVER4.COM has printed over 10 billion+ cards and print products since 1999. That's 25+ years of experience getting dimensions, materials, and finishes right. With 150,000+ businesses trusting their print work to 4OVER4.COM, you're in good company whether you need 50 stickers or 50,000.
The ordering process is straightforward. Pick your sticker shape and size. Choose your material and finish. Upload your design or use a template. Review your proof. Done. 4OVER4.COM's quality guarantee means if something isn't right, they'll fix it.
Explore our custom sticker options to see the full range of sizes, shapes, materials, and finishes available. For even more creative print ideas, browse our Printing Articles or get inspired by these Funny Print Ad Examples.
Blank Templates
What to Remember From This Sticker Sizes Chart Guide
- Small stickers (1-2 inches) work best for envelope seals, product labels on small containers, and subtle branding accents. Keep designs simple at this scale.
- Medium stickers (3-4 inches) are the most versatile size range. They fit laptops, water bottles, packaging, and event giveaways. This is where most businesses start.
- Large stickers (5+ inches) are built for high-visibility applications like vehicle decals, window graphics, and shipping boxes. Use vinyl material for outdoor durability.
- Shape matters as much as size. Round stickers suit logos and seals. Rectangles handle text-heavy designs. Die-cuts follow any custom outline.
- Always design with bleed (0.125 inches) and maintain 300 DPI resolution at final print size. These two details prevent the most common printing issues.
- 4OVER4.COM has served 150,000+ businesses with custom sticker printing across every standard size and shape. With 10,000+ reviews and a 4.8/5 star rating, quality is consistent. For more design inspiration across print products, explore these Graphic Design Portfolio Examples.
| Shape | Dimension (Inches) | Dimension (Millimeters) | Practical Use Case |
|---|---|---|---|
| Rectangle | 2" x 3.5" | 50.8mm x 88.9mm | Standard business card size; perfect for name tags. |
| Rectangle | 3" x 4" | 76.2mm x 101.6mm | Product labels for bottles, jars, and boxes. |
| Rectangle | 4" x 6" | 101.6mm x 152.4mm | A popular choice for shipping and mailing labels. |
| Oval | 1.5" x 2.5" | 38.1mm x 63.5mm | Ideal for candle labels or sealing food packaging. |
| Oval | 2" x 3" | 50.8mm x 76.2mm | Great for branding products with a logo and text. |
| Oval | 3" x 5" | 76.2mm x 127mm | Often used for vehicle decals or on larger containers. |
- Small Sizes (1" to 2"): These are perfect for those subtle branding moments or adding a little finishing touch. Think sealing an envelope, labeling small products like lip balm tubes, or sticking a discreet logo on the back of a phone. They pack a surprising punch without taking over the whole surface.
- Medium Sizes (3" to 4"): This range is the sweet spot for a great mix of versatility and visibility. A 3" x 3" sticker is a classic choice for laptop decals, water bottle branding, and making your packaging pop. It's big enough for detailed artwork and text to be clear and readable from a close distance.
- Large Sizes (5" and up): When you absolutely need to make a statement, you go big. These sizes are made for car bumpers, storefront windows, or slapping on large shipping boxes. They’re designed to grab attention from far away and are almost always printed on tough, weatherproof materials to last.
- 1" x 1" (25.4mm x 25.4mm): These are excellent for tiny branding touches. Think envelope seals, small product labels on cosmetic jars, or a subtle accent on a thank-you card.
- 2" x 2" (50.8mm x 50.8mm): A super popular and well-balanced size. It's large enough for a clear logo and is often slapped on product packaging, coffee cups, and given away as a freebie.
- 3" x 3" (76.2mm x 76.2mm): This is the go-to size for laptop decals and water bottle stickers. It gives you plenty of room for detailed artwork and text, making sure your brand gets noticed.
- 2" x 2" (50.8mm x 50.8mm): A compact but effective size for product packaging, especially on small boxes or bags. It’s a favorite for adding a professional touch to handmade goods.
- 3" x 3" (76.2mm x 76.2mm): Just like its round cousin, this is a prime choice for promotional giveaways and branding personal items like notebooks and phone cases.
- 4" x 4" (101.6mm x 101.6mm): A larger square sticker that really makes a statement. This size is great for event promotions, informational labels, or decorating bigger surfaces like takeout containers.
- 1.5" x 2.5" (38.1mm x 63.5mm): A small but distinctive size, ideal for candle labels, coffee cup branding, or sealing food packaging.
- 2" x 3" (50.8mm x 76.2mm): This versatile size provides enough real estate for both a logo and a line of text, making it great for branding products or as a decorative touch.
- 3" x 5" (76.2mm x 127mm): A larger oval that commands attention. This one is often used for vehicle decals, promotional event stickers, or labeling on bigger containers.
- Product Labeling: Food and drinks need labels with enough room for ingredients, nutrition facts, and barcodes. A tiny, cute sticker won’t cut it. You need a size that fits all the required info without looking like a cluttered mess.
- Shipping and Logistics: There's a reason shipping labels are a standard 4" x 6". They're designed to fit carrier requirements and make addresses and tracking info easy to read at a glance.
- Warning and Safety Labels: For industrial equipment or chemical products, safety warnings have to be legible from a certain distance. This directly dictates the minimum size of the sticker and the font.
- Define the Outline: First, create a solid line around your design in a vector program like Adobe Illustrator. This line becomes the cut path.
- Set a Margin: For a clean, professional finish, your die-line should be slightly offset from your artwork. We recommend about 1/8th of an inch (3mm). This creates a small, uniform border that looks great.
- Simplify Your Paths: Try to avoid overly complex die-lines with tons of sharp points or tiny, intricate details. Smoother curves and simpler shapes always produce a cleaner cut and a more durable sticker.
- Trim Line: This is the finish line, the exact edge where your sticker will be physically cut. It represents the final dimensions you chose, like a 3" x 3" square.
- Bleed Area: Think of this as a safety net. It's a small buffer, usually 0.125 inches (or 1/8"), that extends beyond the trim line. Any background color or image needs to fill this entire area to prevent ugly white slivers if the cutting machine shifts even a tiny bit.
- Safe Zone: This is your VIP section, located just inside the trim line. All your critical elements, your logo, text, and key parts of the graphic, must stay within this zone. Keeping them 0.125 inches away from the trim line guarantees they won't get clipped during cutting.
- Resolution Must Be 300 DPI: Dots Per Inch (DPI) is the key to print quality. Images on the web are often just 72 DPI, which looks great on a screen but will come out blurry and pixelated in print. For crisp, high-quality stickers, your artwork must be created and saved at 300 DPI.
- Use CMYK Color Mode: Your monitor displays colors in RGB (Red, Green, Blue), but professional printers use CMYK (Cyan, Magenta, Yellow, Black). Designing in CMYK from the get-go prevents nasty surprises and color shifts during printing, so your brand colors stay true.
- PDF (Preferred): A high-quality PDF is the gold standard for a reason. It locks in your fonts, images, and vector paths, making sure nothing moves or changes when we open it on our end.
- AI (Adobe Illustrator): If you built your design in Illustrator, sending the native AI file is a fantastic option. This is especially true for custom die-cut stickers because it keeps all the vector paths perfectly intact.
- EPS: This is another solid vector format that maintains scalability and quality without any loss.
- Weatherproof Vinyl: This is the undisputed champ for durability. Vinyl is waterproof, scratch-resistant, and won't fade in the sun. It's the go-to for anything outdoorsy like car decals, window graphics, and equipment labels.
- Classic Paper: A budget-friendly and super popular choice for anything staying indoors. Paper stickers are perfect for product packaging, shipping labels, and promotional giveaways where you don't need to worry about the weather. They have that classic, tactile feel.
- Transparent Polyester: When you want your design to stand out without a distracting background, clear polyester is your answer. It creates that slick, "no-label" look that’s awesome for branding on glass, water bottles, or product containers where you want the surface to show through.
- Gloss Finish: This high-shine coating makes colors pop and gives your sticker a vibrant, reflective look. It’s great for grabbing attention and has the added bonus of being easy to wipe clean, offering a bit of extra protection from moisture and scuffs.
- Matte Finish: For a more modern and understated look, you can't go wrong with matte. It has a non-glare, satin-like surface that feels smooth to the touch. This finish is perfect for sophisticated branding and designs with a softer color palette.
- UV Coating: Think of a UV coating as sunscreen for your sticker. It's a clear, glossy liquid applied over the ink and then zapped with ultraviolet light to cure it. This process gives it superior protection against fading from sun exposure, making it a must-have for any sticker that’s going to live outdoors for a long time.
- Viewing Distance: Where will people see this sticker? A design for a big storefront window needs to be much, much larger than one for a tiny lip balm tube.
- Design Complexity: If your art has a lot of fine detail or small text, you’ll need a bigger sticker to keep it legible. A simple, bold icon can get away with being much smaller.
- Surface Shape: For curved surfaces like bottles or candles, an oval sticker or one made from flexible vinyl will hug the shape much better. A rigid square might have corners that peel up over time.
Common Questions About Sticker Sizes and Dimensions
What are the best practices for using a sticker sizes chart?
Start by measuring the surface where your sticker will go. Leave at least 0.25 inches of margin on all sides. Match your design complexity to the size - simple logos for 1-2 inch stickers, detailed artwork for 4+ inches. Always check dimensions in both inches and millimeters to avoid conversion errors. For larger format applications, Adhesive Wall Fabric handles wall-sized graphics beautifully.
How do I choose the right sticker size for my project?
Consider three factors: the surface area available, viewing distance, and design complexity. Product labels typically need 2-3 inch stickers. Laptop decals work best at 3-4 inches. Vehicle stickers need 5+ inches for readability. A sticker sizes chart guide helps you cross-reference these factors quickly so you don't over-order the wrong size.
What makes sticker sizes effective for marketing campaigns?
The right sticker size turns a simple decal into a walking billboard. A 3-inch branded sticker on a laptop gets seen by dozens of people daily. Businesses using stickers as promotional tools report strong brand recall because stickers stay visible for months or years. For floor-level marketing, Aluminum Floor Graphics offer a durable alternative at larger scales.
How much should I budget for custom stickers in different sizes?
Sticker pricing depends on size, material, quantity, and finish. Smaller stickers (1-2 inches) cost less per unit than larger formats. Paper stickers are more affordable than vinyl. Ordering in bulk drops the per-unit price a lot. At 4OVER4.COM, you can get an instant quote by selecting your exact size and material - no hidden setup fees or surprise charges at checkout.